Laying a Tile Floor
Laying a ceramic tile floor can be a very difficult process. Most
houses
do not have rooms where the walls are close to a perfect 90o,
however, most tiles are either square or rectangular and do have
corners that are close to a perfect 90o. However, the
side walls should be approximately the same distance apart at the front
wall as they are at the back wall, and the front and back walls should
be the same distance apart at both of the side walls. In this
investigation, we are going to lay a tile floor with square
tiles. With this investigation we will see that there is
mathematics involved in something as simple as laying a tile
floor. In order to lay a tile floor we need to have a working
knowledge of algebra and geometry. We need to understand ratios
when working with a scale drawing of our floor, and we need to know
algebra to figure out where to start our tiles and how much grout and
adhesive we will need to use as well as to be aware of the cost of
laying the tile ourselves.
The room that we are tiling is 12ft x 15ft. We also know that the
tiles are 12in x 12in. Before laying the tiles we should draw a
diagram of our floor that shows approximately where we should place our
tiles. We want a scale model, so we will make our room a 12cm x
15 cm parallelogram to approximate the floor on which we will be laying
tile. Since the corners of our floor are not right angles, we do
not want to start with our tiles in a corner, instead we want to begin
with a tile placed a few inches from the corner. We also want the
tiles so that the piece of tile that is on the left side of the floor
is about the same size as the piece of tile on the right side of the
floor. Similarly, we want the piece of tile at the front of the
room to be about the same size as the piece of tile at the back of the
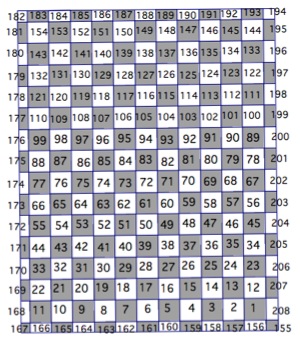
room. When drawing our diagram, we will number the tiles so as to
be sure of their placement on the floor. Here is our diagram:
Now, we have numbered our tiles in order to see approximately how many
tiles we will be needing to tile our floor. So we can see that we
will need approximately 208 tiles in order to tile our floor. One
tile will cost $2.39 regardless of the color of the tile, so we will
need to spend $497.12 on tiles. We can also see from our diagram
that there are 8 rows that contain 6 black tiles and 8 rows that
contain 7 black tiles so we will need 104 black tiles and 104 white
tiles. We will also need adhesive and grout to lay the
tile. The adhesive comes in 3.5 gallon buckets that cost $28.45
each and we will need two buckets, so it will cost $56.90 for
adhesive. The grout comes in one gallon buckets that cost $19.98
each and we will need two buckets, so it will cost $39.96 for
grout. So our total cost for the floor so far is $593.98.
Now before we lay the adhesive, we need to lay some of the tiles so
that we can snap a chalk line to ensure that the tiles will be
straight. We begin by laying tiles #1 through #11 and we try have
the same amount of space between tile #1 and the right wall as there is
between tile #11 and the left wall. Next we lay a vertical row of
tiles, #12 through #144 and try to make it so that we have the same
amount of space between tile #1 and the bottom wall as there is between
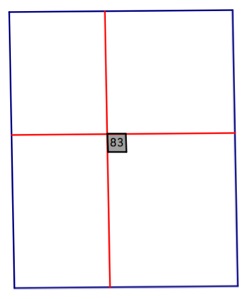
tile #144 and the top wall. Now with a felt tip marker outline
tile #6 and tile #78. After removing the tiles, use a chalk line
to snap a horizontal line across the top of tile #78 and a vertical
line along the left side of tile #6. Where these two lines
intersect is where we will place the upper left hand corner of tile #83.
Now that we have our outline we can begin laying our tile. We
start with laying a small amount of adhesive with the trowel at the
center where the vertical chalk line and the horizontal chalk line
intersect and begin by laying our tile #83. We want to lay enough
adhesive so that we will be able to lay several tiles before applying
more adhesive to the floor. We lay the tile, alternating between
black and white, along the two lines and filling out toward the corners
of the room. Once we have laid all the full sized tiles we are
ready to cut the tiles to go along the edges of the room.
To cut tiles, we need to take a full sized tile and lay it upside down,
one side flush against the wall, on top of the tile that it will be
next to so that it lays over the open space that it will need to fill
as illustrated below.
Using a felt tip marker and a ruler we will mark along the bottom of
the tile where we need to make our cut using the ceramic tile
cutter. We will do this for each of the tiles along the edge,
making two marks on the corner tiles and cutting all using the tile
cutter. Then we lay these tiles as well and prepare our grout.
We mix the grout with water until it is like a thick paste, and use the
rubber float to spread the grout across the top of the floor, pressing
grout in between the tiles. For spreading the grout the float
should be approximately 45o to the floor. Turn the
float so that it is perpendicular to the floor to wipe away the excess
grout. Finally, after about 30 minutes use a damp sponge to wipe
away the remaining excess grout. You then have the option of
applying silicon caulking to finish off your floor after the grout has
had time to dry.
Return to Homepage