Accessing the Server
Creating an About Me Page or Other Web Page Link
Accessing the Server
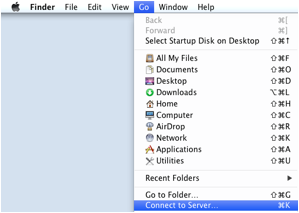
1.
Make sure you’re on the “Finder.” Just click the desktop and
you’ll be there.
2.
Choose the Go menu and choose “Connect to Server.”
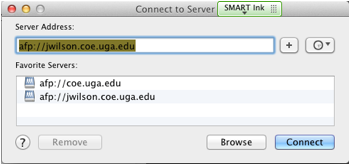
3.
Type in “jwilson.coe.uga.edu” in the Server Address pane and
then click Connect. (It is okay if the “afp://”
appears in front.)
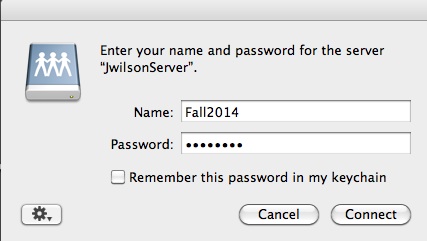
4.
This should lead to a Sign-On screen. For the username, type
“Fall2014” and for password, type “emat6680”.
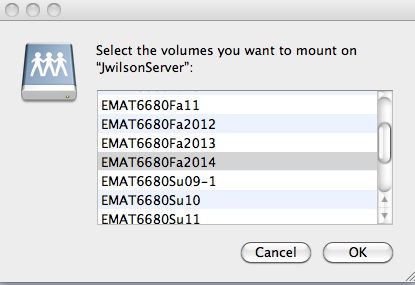
- Locate and click the “EMAT6680Fa14” folder and click
Ok.
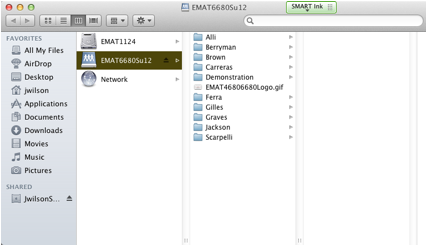
- The server “EMAT6680Fa14” will mount onto your
desktop. Depending on your
display settings, it may show a set of folders:
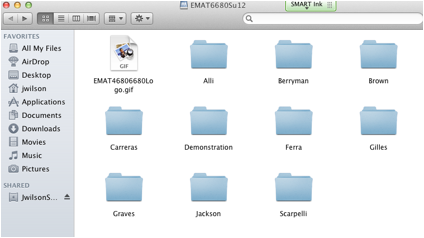
Or it may be a list:
7.
VERY IMPORTANT: When
working on your webpage, drag your ENTIRE folder onto the desktop before you
begin working. Then minimize or eject the “EMAT6680Fa14” folder. This
will safeguard against unintentional data loss. You are making a copy
of your file from the server and placing in on the desktop of your computer.
The idea is that you make changes or additions to your folder, check it
carefully, and then return it to the server. In returning to the server, you
will replace the older file with the same name.
8.
A basic webpage “skeleton” has already been created for
you. (It is assumed you followed
step 7 above.)
Locate the file named
“yourfirstname.html”. Obviously,
you want the file with YOUR first name.
This is your main homepage for your website. You will edit this page
with Dreamweaver, Microsoft Word, or some other preferred html editing software.
Creating an
Email Link to Your Email
In order to create a link on your web
page that will allow others to email you automatically:
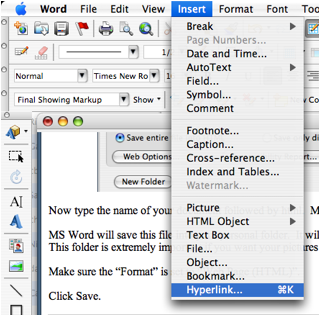
*Open your home page html document
(with Dreamweaver or other html editor)
*Highlight the text on your home page
that you would like to provide a link to your email address. (Most people
highlight the “email me” portion of the text.)
*Choose the Insert Menu and select Hyperlink…
Type in your
email address in the E-Mail field. The text field
will have the highlighted text from your web page.
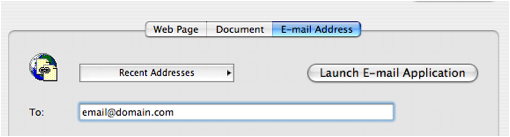
When you complete your email address,
click OK.
*Save your document.
*Upload your files to the server and
replace older files (see below)
Return to top
1.
Inside your folder (that is still on your desktop), create a
new folder (File Menu --> New Folder) and title it “Bio” or
some other name that lets you know this will contain your bio page.
2.
Use Dreamweaver to
create a new document. Title the document as your bio (e.g
JWBio.html or JimWilsonBio.html). It is important to end the document title
with .html. Save the document into the "BIO" folder, even though all
you have done so far is create a title.
3.
Edit the body of your
document as you see fit. Save often.
4.
If you wish to add
images to this page, they must be in .gif or .jpg format. The .gif or .jpg
files should be saved in your "Bio" folder.
A screen capture can be done in several ways. I have found the most reliable
way is to use the "GRAB" utility. You open GRAB, select the capture
menu, and draw a box around the area of the screen you wish to capture. The
captured image will show on your screen. Then COPY the image from the Edit
menu. This puts a copy of the image on a clipboard in the computer. Now use
PREVIEW to open the image from the clipboard and then save it to the "Bio"
folder as a .gif file. You have to give it a name (short names are better) and
the suffix .gif. You also have to select the GIF option. This use of PREVIEW
converts the .tiff image to a .gif image.
· If your image is already in .jpg or .gif format it can be
saved directly to the "Bio" folder.
· Images can be placed in your web document with insert image
(chose Insert from the Menu and select 'image')
5.
Save your
Document.
Return to top
Your webpage TITLE is
what appears at the top of your web browser. You must specifically title
your document unless you want it to have the name “untitled”. This process is
NOT the same as the name you chose when you saved your webpage document.
In Dreamweaver, the title is entered at a space in the header for the page.
This title does NOT need the .html suffix and can be more descriptive than the
name you gave to the page with its .html suffix.
Return to top
Making
Links
The linking process
is one of connecting your various html pages or connecting others web pages to
yours.
To link your “Bio”
page to your home page:
1.
Make sure your “Bio” page has been saved as an HTML file within your folder on
the desktop
2.
Open your home page html file with Dreamweaver.
3.
Highlight the portion of your home page that you wish to make an active link to
your Bio web page. This is probably the text "Something about me."
4.
Select Modify in the menu and click on "Make link"
5.
Navigate to your .html file in the Bio folder and select it.
6. Close
file.
Return to top
Uploading and Updating Your Web Page
Once you’ve completed
editing, you should post your files to the emat6680 server so they will be
accessible via the Internet.
1.
Save all of your files before closing them.
2.
If your folder is open on the desktop, close it.
3.
Drag your personal folder FROM the desktop back INTO the EMAT6680Fa14 folder.
4.
When prompted to confirm that you want to replace your files, click
Replace. Note: If you’ve been working straight off of the server and not
out of your folder on the desktop, you will likely lose data here. If you have
questions, please ask! If you are not prompted to confirm the replacement
of older files, please STOP and ask for help!
5.
After files are copied, navigate to your EMAT 6680 webpage and check to see if
your files are now linked. It may be necessary to click the Refresh/Reload
button on your browser.
6.
Congratulations!
Return to top
Other Tips:
· Save OFTEN
· Keep a USB
Flash drive and copy/paste your entire folder onto your flash drive just to
keep a copy. Each semester students
lose files and do not know why or how they lost them. Be proactive and keep files backed up