Tangent Circles
by
Jackie Ruff
First
we will consider a construction method for a circle tangent to two
given circles at a given point, P, on one of the circles. To find
this construction, it helps to consider what would be true if the
construction were complete.
 So,
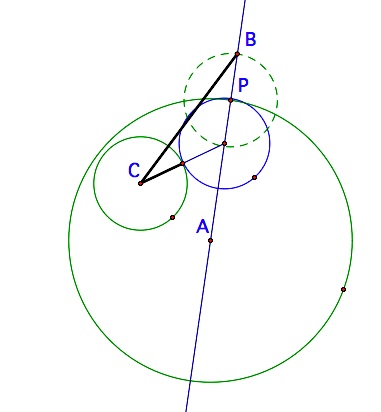
if we study the drawing to the left, we see that the blue circle has
been placed in a position to be tangent to both given
green circles. We see that the distance from its center to
the center of circle C is its radius plus that of circle C. If we
create that same distance by extending segment AP beyond the circle by
a length of the radius of circle C, we have an isosceles triangle with
a vertex at point B. Now, remember that in the construction, the
blue circle won't be there. But, we can locate points C and B. If
that is the base of an isosceles triangle, we can bisect it with a
perpendicular line to locate the other vertex - which will be the
center of our desired tangent circle.
So,
if we study the drawing to the left, we see that the blue circle has
been placed in a position to be tangent to both given
green circles. We see that the distance from its center to
the center of circle C is its radius plus that of circle C. If we
create that same distance by extending segment AP beyond the circle by
a length of the radius of circle C, we have an isosceles triangle with
a vertex at point B. Now, remember that in the construction, the
blue circle won't be there. But, we can locate points C and B. If
that is the base of an isosceles triangle, we can bisect it with a
perpendicular line to locate the other vertex - which will be the
center of our desired tangent circle.
This construction has been carried out in the Geometer's Sketchpad linked here. The file includes a script tool to repeat the construction with different circles. Or, you can see a few of the steps below with resulting tangent circles.
Using the script tool to reconstruct the situation, even if the circles are drawn as disjoint spaces, the blue circle remains tangent as required. Next we will investigate what this construction can do for us.
If we connect the centers of the original circles with the center of the tangent circle, the sum of the lengths of the two segments will be a constant for a pair of given circles. So, we will trace the path of the center of the tangent circle as point P moves around the original circle. We will compare the results for various starting positions of the original two circles.
Obviously where the circles are in relation to each other makes a difference. Remember that the centers of our two original circles are the foci in each of these situations. If the foci are close together in an ellipse, it becomes more circular. As they move further apart, it becomes flatter - more elliptical. In the Sketchpad file, below, we will see what happens as the centers of our two original circles move closer together and further apart. As you watch this animation you will understand what the foci locations with respect to each other have to do with the resulting conic section. Ready?
So,
if we study the drawing to the left, we see that the blue circle has
been placed in a position to be tangent to both given
green circles. We see that the distance from its center to
the center of circle C is its radius plus that of circle C. If we
create that same distance by extending segment AP beyond the circle by
a length of the radius of circle C, we have an isosceles triangle with
a vertex at point B. Now, remember that in the construction, the
blue circle won't be there. But, we can locate points C and B. If
that is the base of an isosceles triangle, we can bisect it with a
perpendicular line to locate the other vertex - which will be the
center of our desired tangent circle.This construction has been carried out in the Geometer's Sketchpad linked here. The file includes a script tool to repeat the construction with different circles. Or, you can see a few of the steps below with resulting tangent circles.
 |  |  |
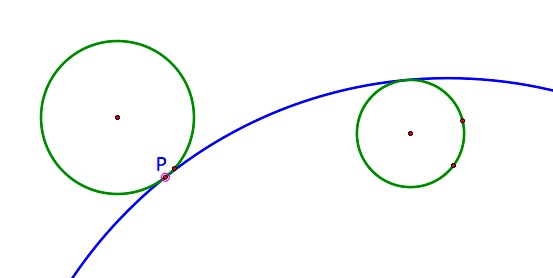
| In this diagram, the isosceles triangle discussed earlier has been created. | The blue circle is tangent to both of the given green circles, tangent to the larger circle at the given point P. | No matter how the green circles are relocated, the blue circle remains tangent. |
Using the script tool to reconstruct the situation, even if the circles are drawn as disjoint spaces, the blue circle remains tangent as required. Next we will investigate what this construction can do for us.
If we connect the centers of the original circles with the center of the tangent circle, the sum of the lengths of the two segments will be a constant for a pair of given circles. So, we will trace the path of the center of the tangent circle as point P moves around the original circle. We will compare the results for various starting positions of the original two circles.
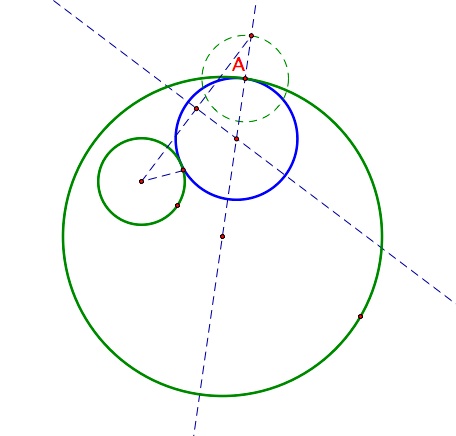
| In this picture, the red circles are the original circles. The sum of the lengths of the blue segments will remain constant as the tangent circle moves. You should look at the animation file to the right. | 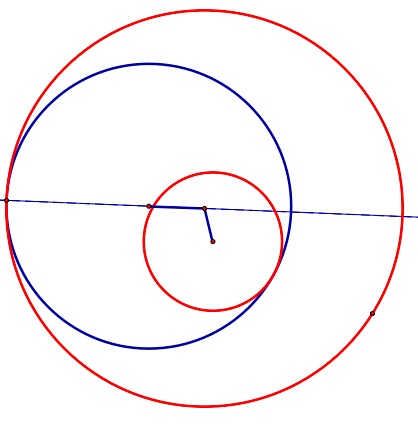 | Open Sketchpad file to see animation. |
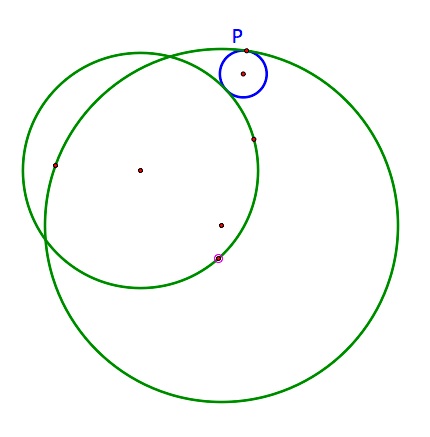
| In the diagram to the right, we have traced the center of the tangent circle as our given point P moved around its circle. If it is not clear why the result was an ellipse, go back and watch the previous animation. Points H and A are the foci of this ellipse and point M takes the position of all the points on the ellipse as P moves around its circle. |  | If you want to watch as this ellipse is drawn, open this Sketchpad file. |
| When circle H was moved from being entirely inside circle A to intersecting it, the result of our trace was still an ellipse. | 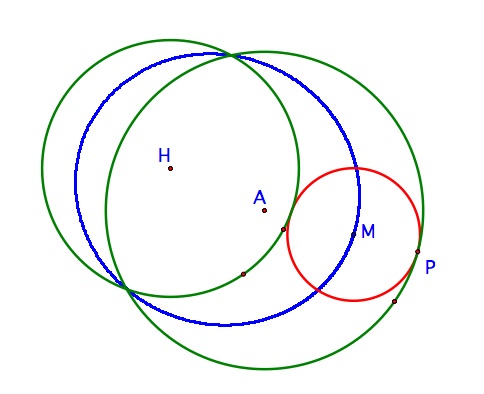 | Here's the file for this one if you want to do this yourself. |
| If we reconstruct this situation with the circle spaces being disjoint, something different happens. What has our trace made now? | 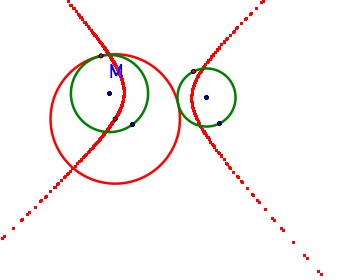 | Try it yourself. |
Obviously where the circles are in relation to each other makes a difference. Remember that the centers of our two original circles are the foci in each of these situations. If the foci are close together in an ellipse, it becomes more circular. As they move further apart, it becomes flatter - more elliptical. In the Sketchpad file, below, we will see what happens as the centers of our two original circles move closer together and further apart. As you watch this animation you will understand what the foci locations with respect to each other have to do with the resulting conic section. Ready?
As
we study a constant related to conic sections called the eccentricity,
we will find that if this number equals 1, the graph is a parabola. If
it is between 0 and 1 we have an ellipse, and if it is greater than 1
we have a hyperbola. The number is the ratio of the distance from
a point to a focus and the distance of the point to a line called the
directrix.