Instructional Unit: Transformation
A transformation is a way of
moving or changing a figure. There are three types of basic transformations
that preserves the size and shape of the figure. These three,
reflections, rotations, and translations, are called isometrics.
Isometrics flip, slide, or turn a figure but never bend or distort
it. In this activity, you'll experiment with basic isometrics
by transforming a flag -shaped polygon.
Investigate: Translations
1. Construct the vertices of a flag shape and construct its interior.
2. In order to translate a shape, you need to indicate a direction and a distance. To do this, construct segmement FG. Then select, in order, point F and point G. In the transform menu, choose Mark Vector.
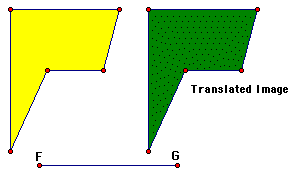
3. Select the interior of the flag; then. In the Transform menu choose Translate. Make sure By Marked Vector is checked in the Translate dialog box, theb click OK.
4. Change the color or shading of the
translate image
5. Display the translated polygon's labe1, then change the label
to Translate Image
6. Drag pont G to change your vector and observe the relationship
between the translated image and the original figure.
Q1. Compare the translated
image to the original figure. How are they different and how are
they the same
Sketch and Investigation: Rotation.
7. In order to rotate a shape, you need to indicate a center of
rotation and an angle of rotation. Start by creating angle JHI
using two attached segments, as indicated at the figure.
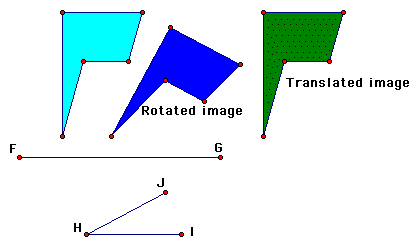
8. Mark angleJHI as an angle of rotation
9. Mark angle JHI as an angle of rotation.
10. Rotate the original flagshaped interior by the marked angle
11. Change the color or shading of the rotated image. Also
display its label and change the label to Rotated
image. Also display its label and change the label to Rotated
image.
12. Drag point I to change your angle, and observe the
relationship between the rotated image and the original figure.
Q2. Compare the rotated image to the original figure. How are
they different and how are they the same?
Sketch and Investigate: Reflections
13. To reflect a shape, you need a mirror line (also
called a line of reflection). Draw a line and label it
Mirror line.
14. Mark the line as a mirror.
15. Reflect the original flag-shaped interior. Your image may
end up off the screen. If it does, move the original figure closer
to the mirror line.
16. Change the color or shading of the reflected image. Label
it Reflected image.
17. Drag your mirror line, and observe the relationship between
the reflected image and the original figure.
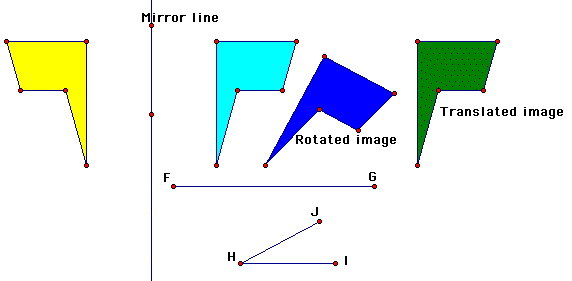
Q3. Compare the reflected image to the original figure. How are
they different and how are they the same?
Q4. Explain whether it is possible for any of the three images
in your sketch to lie directly on top of one another. Experiment
by dragging different parts of your sketch.
Explore More
1. Use reflections, rotations, translations, or combinations
of these transformations to make a design.
2. Reflect a figure over a line, then reflect the image over a
second line that intersects the first. What single transformation
would take your original figure to the second reflected image?
3. Reflect a figure over a line, then reflect the image over a
second line that is parallel to the first. What single transformation
is the same as this combination of two reflections?
Properties of Reflection
When you look at yourself in a mirror, how far away does your
image in the mirror appear to be? Why is it that your reflection
looks just like you, but backwards? Reflections in geometry have
some of the same properties of reflections you observe in a mirror.
In this activity, you'll investigate the properties of reflections
that make a reflection the "mirror image" of the original.
Sketch and Investigate: Mirror Writing
1. Construct vertical line AB
2. Construct point C to the right of the line.
3. Mark AB as a mirror.
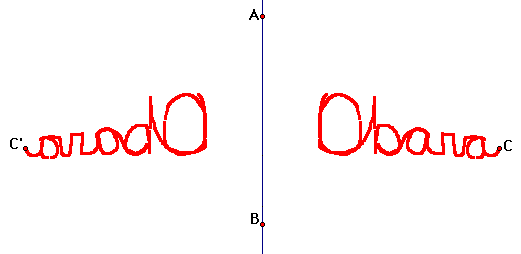
4. Reflect point C to construct point
C'.
5. Turn on Trace Points for points C and C'.
6. Drag point C so that it traces out your name.
Q1 What does point C' trace?
7. For a real challenge, try dragging point C' so that point C traces out your name.
Sketch and Investigate: Reflecting Geometric
Figures
8. Turn off Trace Points for points
C and C'.
9. Construct triangle CDE.
Diagram
10. Reflect triangle CDE (sides and vertices) over
AB.
11. Drag different parts of either triangle and observe how
the triangles are related. Also drag the mirror line.
12. Measure the lengths of the sides
of triangles CDE and C'D'E'.
13. Measure one angle in triangle CD E and measure
the corresponding angle in triangle C'O'E'.
Q2 What effect does reflection have
on lengths and angle measures?
Q3 Are a figure and its mirror image always congruent? State your
answer as a conjecture.
Q4 Going alphabetically from C to D to E in triangle CDE, are
the vertices oriented in a clockwise or counterclockwise direction?
In what direction (clockwise or counterclockwise) are vertices
C',D', and E'
oriented in the reflected triangle?
15. Drag different parts of the sketch around and observe relationships between the dashed segments and the mirror line.
Q5 How is the mirror line related to a segment connecting a
point and its reflected image?
Explore More
1. Suppose Sketchpad didn't have a
Transform menu. How could you construct a given point's mirror
image over a given line? Try it. Start with a point and a line.
Come up with a construction for the reflection of the point over
the line using just the tools and the Construct menu. Describe
your method.
2. Use a reflection to construct an isosceles triangle. Explain
what you did.
Reflections in the Coordinate Plane
In this activity, you'll investigate
what happens to the coordinates of points when you reflect them
across the x- and y-axes in the coordinate plane.
1. Show the grid.
2. Draw triangle CDE with vertices on the grid
3. Measure the coordinates of each vertex
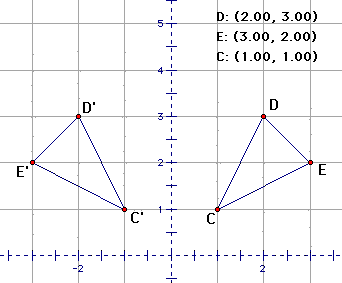
4. Mark the y -xis as a mirror.
5. Reflect the triangle.
6. Measure the coordinates of the image's vertices.
7. Drag vertices to different points on the grid and look for
a relationship between a point's coordinates and the coordinates
of the reflected image across the y-axis.
Q1 Describe any relationship you observe between the coordinates
of the vertices of your original triangle and the coordinates
of their reflected images across the y-axis.
8. Now mark the x-axis as a mirror and reflect your original
triangle.
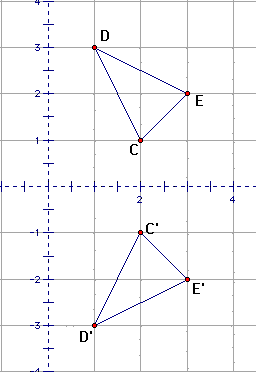
9. Before you measure coordinates, can you
guess
what they'll be? Measure to confirm.
Q2 Describe any relationship you observe C between the coordinates
of the original points and the coordinates of their reflected
images across the x- axis
Explore More
1. Draw a line on the grid that passes
through the origin and makes a 45degree angle with the x-axis
(in other
words, the line y = x). Reflect your triangle across
this line. What do you notice about the coordinates of the vertices
of this image?
Translations in the Coordinate Plane
In this activity, you'll investigate
what happens to the coordinates of points when they're translated
in the coordinate plane.
1. Show the grid.
2. Draw a segment from the origin to anywhere on the grid. Label
the end point C
point C.
3. Measure the coor- dinates of point C.
4. Mark vector AC
5. Draw triangle triangle DEF with vertices on the grid
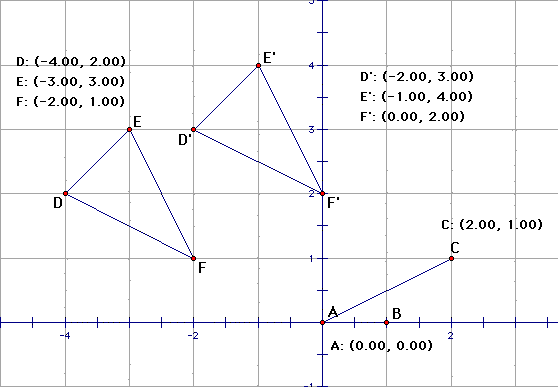
6. Translate the triangle by the marked
vector.
7. Measure the coordinates of the two triangles' six vertices.
8. Experiment by dragging point C or any of the triangle vertices.
Look
for a relationship between a point's coordinates and the coordinates
of its image under a translation.
Q1. Where can you drag point C so that the original points and
the corresponding image points always have the same y-coordinates
but have different x-coordinates?
Q2. Where can you drag point C so that the original points and
the corresponding image points always have the same x-coordinates
but have different y-coordinates?
Q3. When the vector defined by the origin and point C translates
your original triangle to the left and up, what must be true of
the coordinates of point C?
Q4 Suppose point C has coordinates (a, b). What are the
coordinates of the image of a point (x, y) under a translation
by (a, b)?
Reflections over Two Parallel Lines
In this investigation, you'll see
what happens when you reflect a figure
over a line then reflect the image over a second line parallel
to the first,
Sketch and Investigate
1, Construct any irregular polygon
interior.
2. Show the label of one of the polygon's vertices and change
the label to A.
3. Construct a line EF.
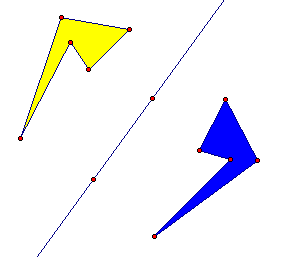
4. Mark the line as a mirror and reflect
the polygon and point A over it.
5. Construct point G and a line through point
G parallel to EF
6. Mark this second line as a mirror and reflect the first reflected
image and point A' over it.
7.Drag the original figure and the two lines and observe their relationships to the two images.
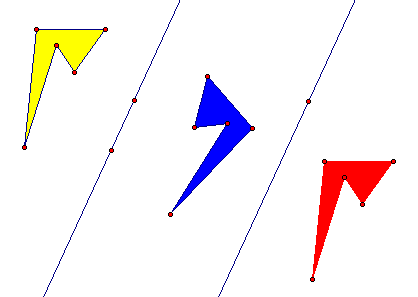
Q1 Two reflections move your original figure to its second image. What single transformation do you think will do the same thing? (If you're not sure, go on to the next steps, then come back to this question.)
Reflections over Two Parallel Lines (continued)
8. Construct AA ".
9. Construct points H and I where AA" intersects
the two lines.
10. Measure AA " and HI.
Q2 Drag one of the lines and compare the two
E distances. How are they related?
Q3 HI is the distance between the two lines. Why?
11. Mark AA " as a vector, then translate the original
figure by this
vector.
Q4 Describe the result of Step 11, above. What single transformation
is equivalent to the combination of two reflections over parallel
lines?
Q5 Answer the following questions to explain why AA "
and HI are related as they are:
a. How does AH compare to HA '?
b. How does A'I compare to IA "?
c. AA' + A' A" =
d. Complete the rest of the explanation on your own.
Explore More
1. In the same sketch, try reflecting your figure and then
its image over the two lines in the opposite order. Describe the
result.
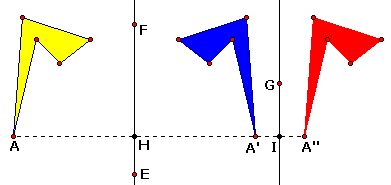
Reflections over Two Intersecting Lines
In this investigation, you'll see what happens
when you reflect a figure over a line and then reflect
the image over a second line that intersects the first.
Sketch and Investigate
1. Construct any irregular polygon interior.
2. Show the label of one of the
polygon's vertices and change it to A.
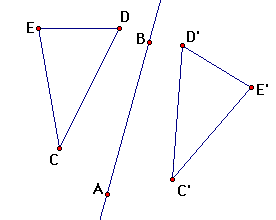
3. Construct two intersecting lines and their point of intersection.
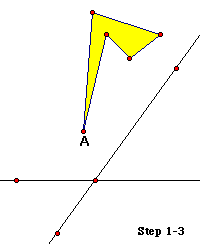
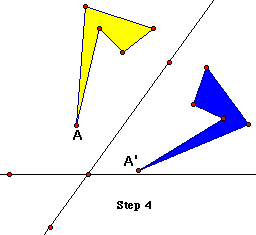
4. Mark the line closest to the polygon as a mirror,
then reflect the polygon and the labeled point over this
line. Change the shading or color of the image. (See the figure
below left. If necessary, move the polygon so
Steps 1-3 that the image falls between the lines.)
5. Mark the other line as a mirror, then reflect the image from
the first j reflection over this second line. Change the shading
or color of this second image. (See the figure below right.)
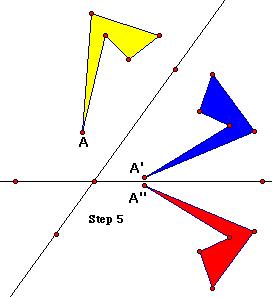
6. Drag the original figure and the two lines
and observe their relationships to the two images.
Q1 Two reflections move your original figure to its second image.
What single transformation do you think
will do the same thing? (If you're not sure, go on to the next
steps, then come back to this question.)
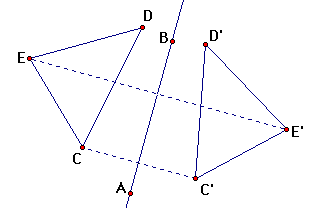
7. Construct AI, where point A is a point on the original figure
and point I is the point of intersection of the lines.
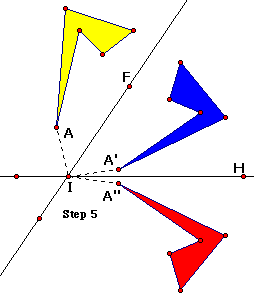
8. Construct AI' and IA"
9. Measure angle AIA"
10. Measure angle FIH, the angle between the lines.
Q2 Compare the two angle measures. How are they related?
11. Mark point I as a center for rotation and mark LAIA ",
then rotate the original figure by this angle.
Q3 Describe the result of step 11. What single transformation
is equivalent to the combination of two reflections
over intersecting lines? .
Q4 Answer the following questions to explain why m angle AIA"
and
M angle FIH are related the way they are:
a. How does m angle AIF compare to m angle AIA'?
(Try to answer without measuring first.)
b. How does m angle A'IH compare to m angle A'IA"?
c. m angle AIA' + m angle A'IA" = m angle
d. Complete the rest of the explanation on your own. Use a separate
sheet, if necessary,
Glide Reflections
In this activity you will investigate an isometry
called a glide reflection. Glide reflection is not a transformation
'found in the Transform menu, I but you'll define it as a custom
transformation, and in the process you'll learn what a glide reflection
is and what it does.
Sketch and Investigate
1. Construct an irregular polygon interior,
like polygon ABCD, shown at right.
2. Construct line EF.
3. Mark EF as a mirror and reflect the polygon interior across
EF.
4. Construct a point G on the line so that E and G are about an
'
inch apart.
5. Mark EG as a vector and translate the reflected
image by the marked vector. This second image is a glide reflection
of your original figure.
6. Drag point G to see how it affects the glide-reflected image.
7. Hide the intermediate image (the first reflection).
8. Select the glide-reflected image and the original image; then,
in the Transform menu, choose Define Transform. Name the 2-step
transformation "Glide Reflection."
9. Glide Reflection should now be a command in the Transform menu.
Use Glide Reflection to construct several more images, as shown
at right.
10. Drag parts of your sketch (vertices of the original polygon,
point G, points E and F, the line) and observe the effects.
Glide Reflections (continued)
Q1 A glide reflection is the product
of two transformations. What are they?
Q2 A translation is also the product of two transformations. What
are they?
Q3 A glide reflection can be thought of as
a product of what three transformations?
Explore More
1. Create a polygon that looks like a foot,
then use glide reflections to make a sketch that looks like footprints
in sand. To make the footprints appear sequentially, as if made
by a walking invisible person, follow these steps:
(a) Make Hide/Show action buttons for each
footprint.
b. Double-click on each Show button with the Information tool
(the question mark) and give each a 1 second
in-sequence delay.
c. Make a Sequence button with the Show buttons.
d. Sequence the Hide buttons to hide all the footprints.
2. Experiment with reflections across three random lines. Does
this
produce a glide reflection?
3. What's the product of a rotation and a reflection? What's the
product of a rotation and a translation?
Symmetry in Regular Polygons
A figure has reflection symmetry if you can
reflect the figure over a line so that the image will coincide
with the original figure. The line you reflect over is called
a line of symmetry or a mirror line. A figure has rotational symmetry
if you can rotate it some number of degrees about some point so
that the rotated image will coincide with the original figure.
In this exploration, you'll look for reflection and rotation symmetries
of regular polygons.
Sketch and Investigate
1. Construct a regular polygon and its interior. You can use an equilateral triangle, square, a regular pentagon, or a regular hexagon. You may want to have different groups in your class investigate different shapes.
2. Construct a line.
3. Mark the line as a mirror and reflect the
polygon interior over it.
4. Give the image a lighter shade.
5. Drag the line until the image of your polygon coincides exactly
with the original.
Q1 When a reflection image coincides with the original figure,
the reflection line is a line of symmetry. Describe how the line
of symmetry is positioned relative to the figure.
6. Drag the line so that it is a different line of symmetry. Repeat
until you have found all the reflection symmetries of your polygon.
Q2 Fill in one entry in the table below: the number of reflection
symmetries for your polygon. (Note: Be careful not to count the
same line twice!) You'll come back to fill in other entries as
you gather more information.
| Number of sides of regular polygon | 3 | 4 | 5 | 6 | 7 | .. | n |
| Number of reflection symmetry | .. | ||||||
| Number of rotation symmetry | .. |
Symmetry in Regular Polygons (continued)
Next, you'll look for rotation symmetries.
7. Move the line so that the reflected Image is out of the way.
8. If the polygon's center doesn't already
exist, construct it.
9. Use the Segment tool to construct an angle.
10. Measure the angle.
11. In Preferences, set the Angle Unit to directed degrees.
12. Mark the center of the polygon as a center for rotation and
mark
the angle measurement. Rotate the polygon interior by this marked
angle measurement.
13. Give the rotated image a different shade.
14. Change the angle so that the rotated image fits exactly over
the original figure.
Q3 What angle measure causes the figures to coincide? Polygon:.........
Rotation angle: .........
15. Continue changing your angle to find all possible rotation
symmetries of your polygon.
Q4 Count the number of times the rotated image coincides with
the original when rotating from 0° to 180° and from -180°
back to 0°. In your chart on the preceding page, record the
total number of rotation symmetries you found. Note: Count one
complete revolution as one of your rotation symmetries.
Q5 Combine the results from other members of your class to complete
your chart with the reflection and rotation symmetries of other
regular polygons.
Q6 Use your findings to write a conjecture about the reflection
and rotation symmetries of a regular n-gon. Include in your conjecture
a statement about the smallest angle of rotational symmetry greater
than zero.