Paper Folding and Other Activities
Lesson 5, Day 1
Information and Investigation Section
Information Section:
Parabola Paper Folding Exercise:
Return to the theory
Explanation of the process (what are we doing?)
GSP Example for the parabola.
If you have Geometer's
Sketchpad loaded on your system, you can download and run
the following:
GSP Parabola Example
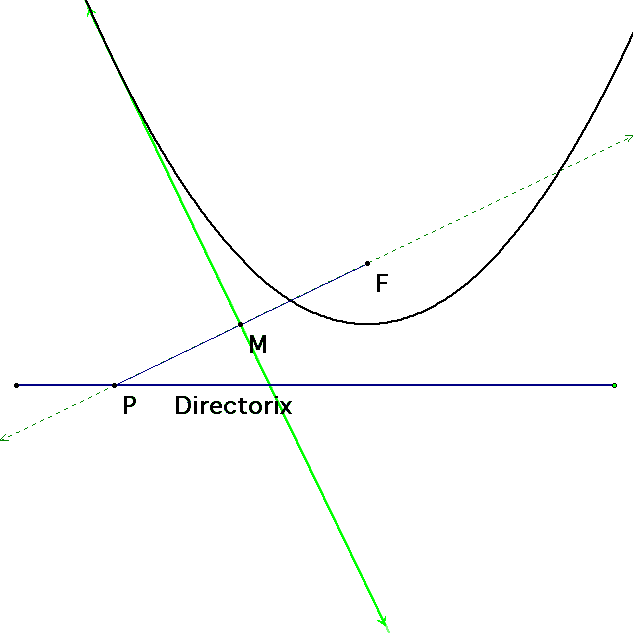
The first diagram below shows the basic layout
of the construction. A parabola is constructed using the standard
tools.
A point is chosen on the directorix; a line
segment is constructed between that point and the focus.
The perpendicular bisector of that line segment
is then created. This segment will be tangent to the parabola.
If we animate the point we chose on the directorix and trace
the perpendicular bisector, the parabola will be traced out.
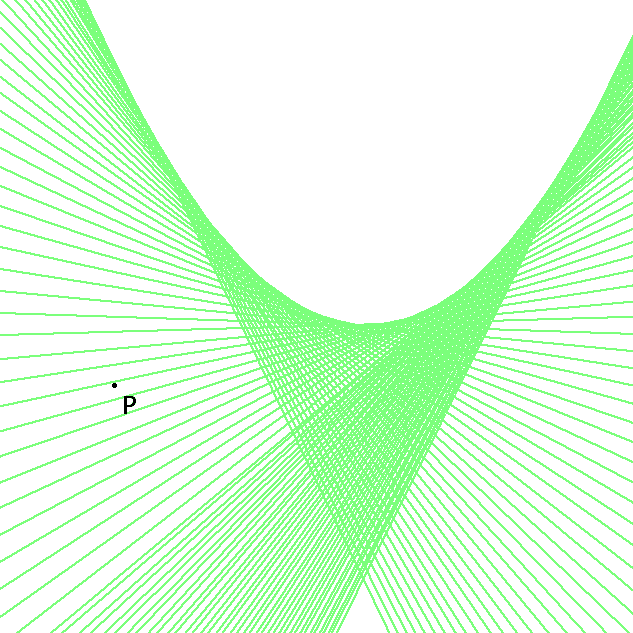
This second sketch shows the same file as
above, after it has been animated (traced).
Ellipse
Paper Folding Exercise:
Return to the theory
We know from the definition of the ellipse,
that the sum of the measure of the lengths from any point on
the ellipse to each of the foci is a constant value. How does
this help us with a way to construct an ellipse from wax paper(also
referred to as patty paper)?
If we can construct a circle around one of
the foci (F1), with a radius of the circle large enough to encompass
the second foci (F2) within the circle, then:
We can pick any point on the circle. (P)
We can construct a line segment (l) between
this point P and the other foci (F2).
We then can determine the midpoint (M) of
this line segment (l). What can be said about the line that is
perpendicular to l and contains M? This line will be tangent
to ellipse.
Explanation of the process (what are we doing?)
How do we do this with paper and a pencil?
We must pick our foci and mark them on a piece
of paper.
We must construct a circle around the first
foci, using a compass or other circular object. Please note,
we need to have the
GSP Example for the ellipse.
If you have Geometer's
Sketchpad loaded on your system, you can download and run
the following:
GSP Ellipse Example
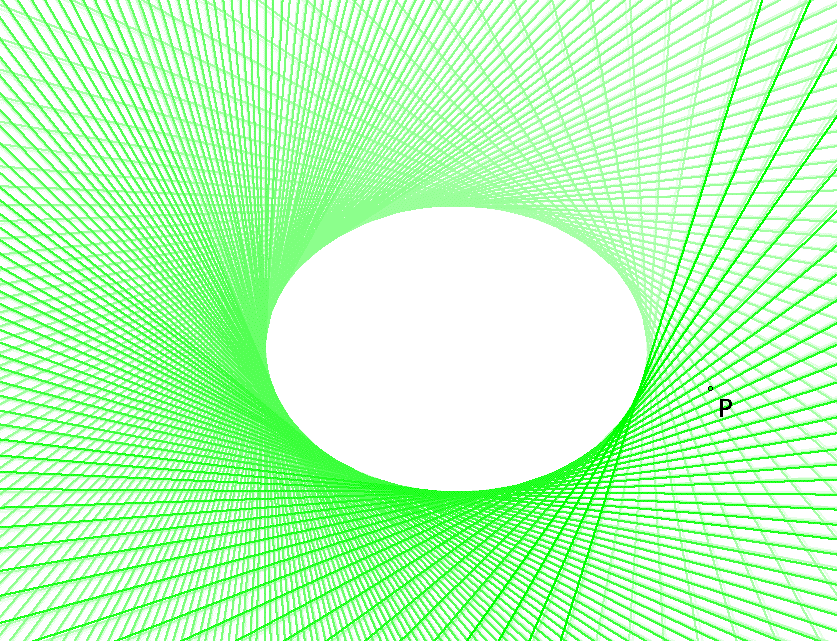
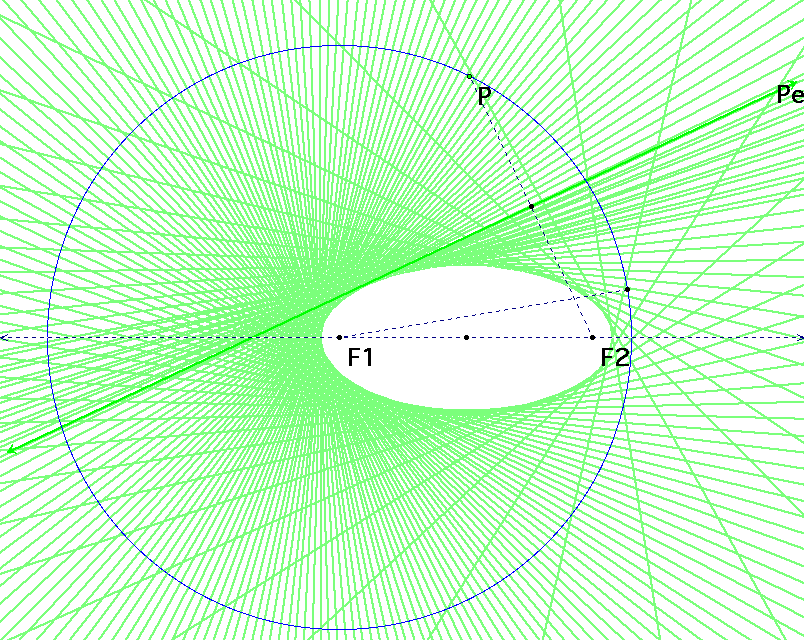
The first diagram below shows the basic layout
of the construction. A circle is constructed using the standard
tools, around the first foci (F1).
The second foci (F2) is chosen abitrarily
within the circle.
A point is chosen on the circle; a line segment
is constructed between that point and the second foci.
The perpendicular bisector of that line segment
is then created. This segment will be tangent to the ellipse.
If we animate the point we chose on the circle and trace the
perpendicular bisector, the ellipse will be traced out.

This second sketch shows the same file as
above, after it has been animated (traced).
Hyperbola Paper Folding Exercise:
Return to the theory
We know from the definition of the hyperbola,
that the difference between the measure of the lengths from any
point on the hyperbola to each of the foci is a constant value.
How does this help us with a way to construct a hyperbola from
wax paper(also referred to as patty paper)?
If we can construct a circle around one of
the foci (F1), with a radius of the circle lsmall enough not
to encompass the second foci (F2) within the circle, then:
We can pick any point on the circle. (P)
We can construct a line segment (l) between
this point P and the other foci (F2).
We then can determine the midpoint (M) of
this line segment (l). What can be said about the line that is
perpendicular to l and contains M? This line will be tangent
to hyperbola.
Explanation of the process (what are we doing?)
GSP Example for the hyperbola.
If you have Geometer's
Sketchpad loaded on your system, you can download and run
the following:
GSP Hyperbola Example
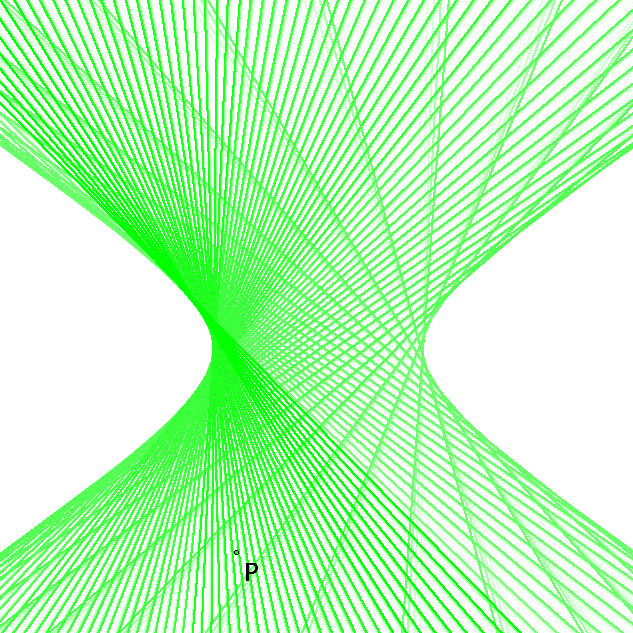
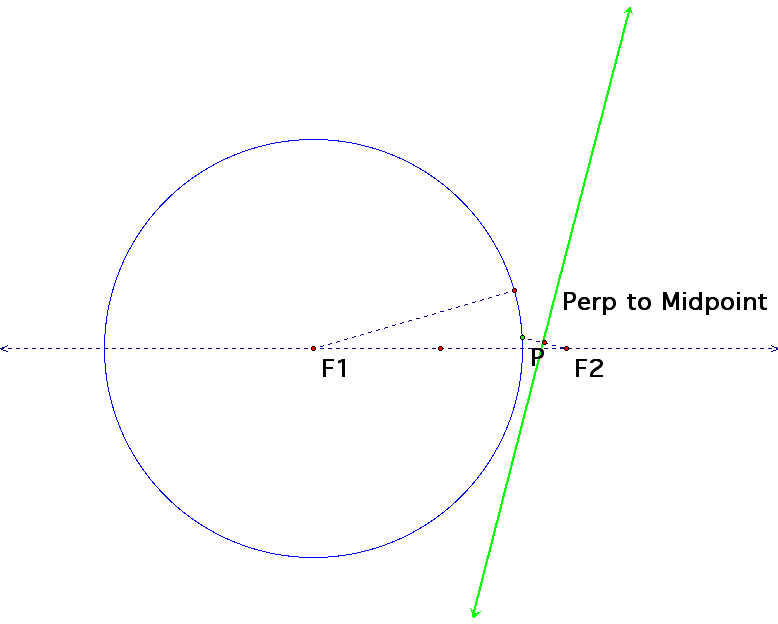
The first diagram below shows the basic layout
of the construction. A circle is constructed using the standard
tools, around the first foci (F1).
The second foci (F2) is chosen abitrarily
outside of the circle.
A point is chosen on the circle; a line segment
is constructed between that point and the second foci.
The perpendicular bisector of that line segment
is then created. This segment will be tangent to the hyperbola.
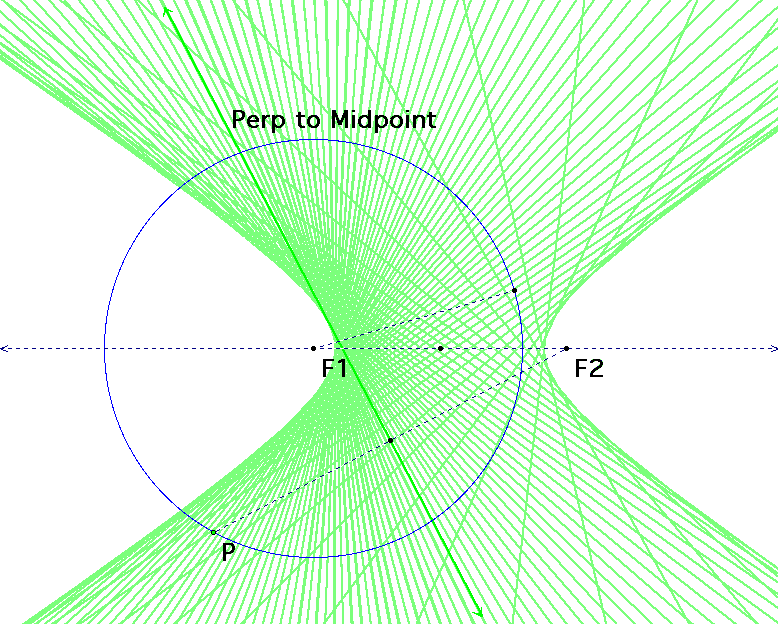
If we animate the point we chose on the circle and trace the
perpendicular bisector, the hyperbola will be traced out.
This second sketch shows the same file as
above, after it has been animated (traced).
Investigation Section
Materials Needed: Wax paper, straight edge,
pencil, an object to make a circle (compass, bowl, plate etc.)
Activity 1 - Construction of the Parabola
1. Get a piece of wax paper, preferable
square (10" by 10" or better is good)
2. Mark a point on the paper. (F) This
will be the focus for the parabola.
3. Draw a line on the paper (l). This will
be the directorix for the parabola.
4. Pick any point on the line (you can
start at one side and then work down the line, for the next point)
5. Fold the paper over such that the point
you picked on the line matches over the focal point. The creased
line in the paper marks a perpendicular bisector between the
focus and the point on the line.
6. Pick another point on the line and repeat
steps 4 and 5, until you have picked points all across the line.
7. The resulting set of lines/creases will
form out the parabola.( these lines will all be tangents to the
parabola.
Activity 2 - Construction of the Ellipse
1. Get a piece of wax paper, preferable
square (10" by 10" or better is good)
2. Construct a circle on the wax paper.
You could use a plate or bowl, sufficiently large.
3. Determine the center of the circle.
This will be marked F1. (You can determine the center of the
circle by constructing 2 chords, determining their midpoints
and drawing the perpendicular lines through the midpoints to
these chords; where the 2 perpendiculars intersect should be
the center of the circle).
4. Mark the second foci (F2) anywhere else
within the circle.
5. Pick a point on the circle.(P)
6. Fold the paper over such that the point
(P) lines up on top of F2. The crease of the paper on this fold
will mark a perpendicular bisector of the line between P and
F2.
7. Pick another point on the circle. (start
to go around the circle, with a point about each 15 degrees.)
8. Repeat steps 5, 6 and 7, until you've
gone completely around the circle.
9. The resulting family of creases will
mark the points tangent to the ellipse. An ellipse should now
have taken form.
Activity 3 - Construction of the Hyperbola
1. Get a piece of wax paper, preferable
square (10" by 10" or better is good)
2. Construct a circle on the wax paper.
You could use a cup or glass. This will be a smaller circle than
what was used for the ellipse.
3. Determine the center of the circle.
This will be marked F1. (You can determine the center of the
circle by constructing 2 chords, determining their midpoints
and drawing the perpendicular lines through the midpoints to
these chords; where the 2 perpendiculars intersect should be
the center of the circle).
4. Mark the second foci (F2) anywhere else
outside the circle.
5. Pick a point on the circle.(P)
6. Fold the paper over such that the point
(P) lines up on top of F2. The crease of the paper on this fold
will mark a perpendicular bisector of the line between P and
F2.
7. Pick another point on the circle. (start
to go around the circle, with a point about each 15 degrees.)
8. Repeat steps 5, 6 and 7, until you've
gone completely around the circle.
9. The resulting family of creases will
mark the points tangent to the hyperbola. A hyperbola should
now have taken form.
Return to Lesson 5, Day 1 Page