
Assignment #7: Tangent Circles
By: Keith Schulte
Our assignment today is to
construct a circle that is tangent to two given circles. We will use Geometer’s
Sketchpad (GSP) and construct a script tool that can be used to recreate this
scenario without having to redo the entire construction. This can help us
explore the Geometry of this example and extensions, without having to take
time to set-up the construction.
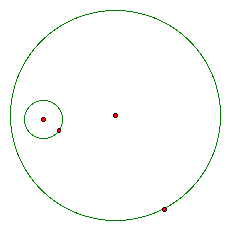
We are given two circles and
need to create a circle that is always tangent to both. We will start with a
large circle and a small circle in the interior of the large circle. It looks like this:
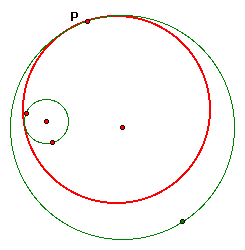
The tangent circle we want to
create will be on the interior of the large circle and the small circle will be
on the interior of the new tangent circle. When we're done, it will look like
this. The two green circles are our original circles above and the red circle
is our desired tangent circle.
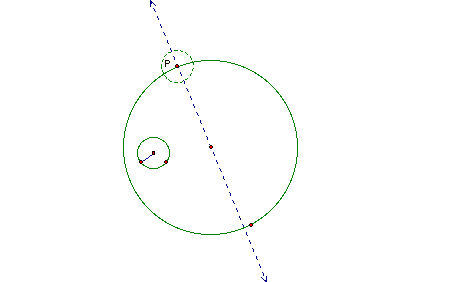
We pick an arbitrary point on
the large circle. We will label it point P. This point will be the point of
tangency between the large circle and our desired tangent circle. Next we
construct a line though point P and the center of the large circle. Then we
create a segment that is the radius of our small circle. We use the radius and
point P to create a construction circle at point P. Now we have the following:
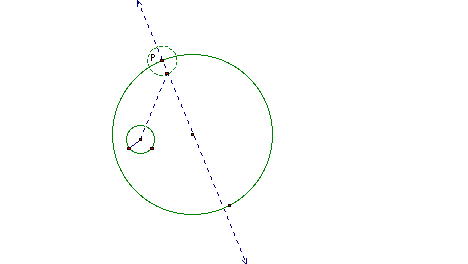
We now need to relate the
parts of our construction. First we create a point of intersection between the
line passing through point P and the interior of the construction circle. Next
we construct a line segment connecting the center of the original small circle
and the point of intersection of our construction circle and the line passing
through point P. The construction now looks like this:
The next step is to construct a mid-point on the segment between the two smaller circles. Then, selecting the mid-point and the segment, we create a perpendicular line. Where the perpendicular line intersects with the line through point P will be the center of our desired tangent circle. The radius of our desired circle is the segment from the circle center to point P.

The construction is now complete. The diagram above includes all of the construction elements. To see a script tool of this construction, you can click HERE . This will open my toolfolder (this only works if you have GSP on the computer you are working on). When you open my toolfolder, it will be a blank screen. You will need to have the GSP toolbox open. Select the bottom option (the arrow and three dots). Then, under ‘This Document’, select TanCircles2A7. Click on my toolfolder and drag the mouse away from the dot. It will create a circle. Then click somewhere inside the circle you just created and drag the mouse a little way and you will see the complete construction. You can then explore. The script tool has an animate button at the top left (after you’ve followed the steps above). The animation animates point P, and traces the center of the tangent circle around the centers of the two original circles. The trace creates an ellipse, whose loci are the centers of the two original circles.
Here are some ideas for other similar explorations.
· Instead of creating the intersection point on the inside of the construction circle, create it on the outside. How does this change the construction? It should create a tangent circle that has the original small circle on the outside of the tangent circle, whereas in our case above, the original small circle was inside the tangent circle.
· Can you construct a tangent circle when the small circle is exterior to the large circle?
· What would you need to do to construct the tangent circle if the arbitrary point P is on the original small circle, instead of on the large circle?
If you have difficulty with these extensions, look at some of my other script tools (CircleTanto2givencircles, TanCircles3A7 and TanCircles4A7).