Teaching Notes:
In this lesson, students look at and explore the geometric definition of a parabola. The goal of this lesson is for students to be able to use Geometer's Sketchpad to create a parabola based on this definition. For more advanced classes, or for classes with a lot of experience using GSP, it is suggested that they simply be given the definition and asked to construct the parabola based on the definition. For the standard class, this activity may be done best as either a class activity or a teacher demonstration.
The Defintion:
A parabola is the set of points equidistant from a line, called the directrix, and a fixed point, called the focus. The focus is not on the directrix.
The Exploration:
Construct a parabola given a fixed point for the focus and a line (segment) for the directrix.
Suggested Techniques:
1. Use an Action Button to animate a point in the shape of a parabola.
2. Use the locus command to create the parabola from a constructed point.
The Strategy for this Construction:
We need to construct the set of points (a parabola) which is equidistant from a given line (the directrix) and a given point (the focus). So we'll start with a line and put a point in any random place. What we'll need to do is create a point which is always equidistant from both the point and the line, then animate it or find the locus of those points.
The Construction:

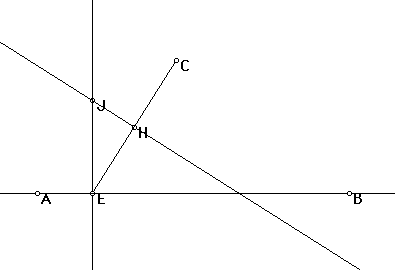
Start with a line AB and a randomly-placed point not on the line, called C. AB will be the directrix and C will be the focus. In order to measure the distance from a point to a line, you need to take its perpendicular distance, so we'll need a random point on AB which we can animate in order to create our parabola. We'll call that point E. Construct a perpendicular to AB through point E. The point which will be used to create the parabola will be somewhere on this line. Now, draw a segment from C (our focus) to E (our random point on AB). Find the midpoint of segment CE and call it H. H will be the vertex of the parabola when E is directly below (or above) C. Now construct a perpendicular to CE through H. This line will always be tangent to the parabola, and where it intersects the line perpendicular to AB through E, is the tangent point. We'll call this point J. This is the point which we'll trace in order to create the parabola. (See the GSP sketches below for Parts A, B, and C. All of the sketches are completely dynamic, so you can move around line AB and point C to see what happens when you vary the distance between the directrix and the focus.)
GSP Sketch: Animation of traced point to create parabola
GSP Sketch: Locus of points equidistant to a point and a line (a parabola)
Wrap-Up:
Students should now be familiar with methods used to construct a parabola geometrically. This activity is a good review of students' geometric skills and shows them how a parabola (which they had previously only thought of algebraically) has very direct connections to geometry.