POLYGONS AND SYMMETRY
EXPLORATION 6-1. REFLECTION-SYMMETRIC
FIGURES
Objective: Determine properties of reflection-symmetric
figures.
1. CREATE A NEW DOCUMENT with the variable refsym.
|
2. Create a vertical line on the screen.
Draw the left hand side of a face with polygons, circles, and
arcs as shown to the right.
Create an arc
Press F3 and choose 2:Arc, move the pencil to a starting
position, press ENTER, move the pencil a little more, press ENTER,
and move the pencil one more time until the desired arc, and
press ENTER. Move the endpoints of the arc if
|
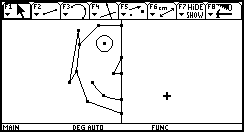 |
you would like to adjust its length. Move
the middle point of the arc if you would like to adjust its curvature.
|
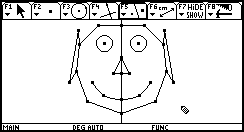
3. Reflect each of the objects over the
line until your face is complete.
4. Adjust the size and shape of the ears,
eyes, nose, and lips on the LEFT SIDE of the screen and
observe the changes on the right side. For smoother movement,
you may want to move the pointer on top of a point, press
2nd, HAND KEY to LOCK, and drag using the keypad. Press ESC to
return to the pointer when you are finished dragging.
|
 |
5. The vertical line is called a line of
symmetry. The face is reflection-symmetric about this line.
State at least two properties of a figure that is reflection-symmetric
(without using reflection or symmetric in your explanation).
| 6. Drag the symmetry
line until it is oblique and the face looks distorted. Construct
a segment with the middle of the eyes as endpoints. What geometric
property will the symmetry line have on this segment? Verify
this conjecture by making appropriate measurements and/or calculations.
Describe your findings below. |
 |
EXPLORATION 6-2. ISOSCELES AND EQUILATERAL
TRIANGLES
Objective: Determine properties
of isosceles and equilateral triangles.
1. CREATE A NEW DOCUMENT with the
variable isostri.
2. Create scalene triangle ABC (with unequal
side lengths), measure and label segments AB and AC as shown below
to the left.
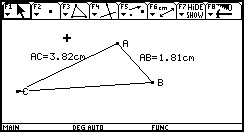
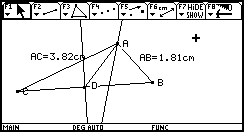
3. Construct the midpoint D of side BC.
Construct the median of BC (the segment connecting A and D), the
perpendicular bisector of BC, and the angle bisector of < CAB
as shown in the diagram above to the right.
4. Drag the vertex A until the median, perpendicular bisector,
and angle bisector coincide. What type of triangle results? Explain
below how you determined this result.
5. Measure the base angles, < ACB and < ABC. Write an
IF...THEN... statement below describing the condition in
step four and your results in step five.
6. Create the perpendicular bisectors of the other sides of
the triangle, segments AC and AB. Drag the vertices of the triangle
until the triangle is reflection symmetric with respect to all
of the perpendicular bisectors.
7. Measure the remaining side and angle
in the triangle. What type of triangle results? Explain below
how you determined this result.
EXPLORATION 6-2P. SHARK ATTACK.
Objective: Determine the ideal position within an equilateral
triangle given a series of conditions.
1. CREATE A NEW DOCUMENT with the variable shark.
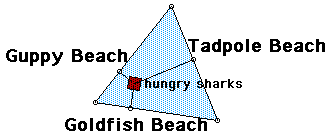
Guppy, Tadpole, and Goldfish beach surround Equilateral Sea,
a perfect equilateral triangle. Tiger shark and his family swim
together in the Equilateral Sea. When the family gets hungry,
Tiger makes sure they stay in one place (so he doesn't lose them),
and then finds food at each of the beaches. Tiger gets food at
one beach at a time because he can only hold so much food in his
mouth at a time. So he will get food at one beach, come back to
share the food (small square inside the triangle), and then repeat
the process at the other beaches.
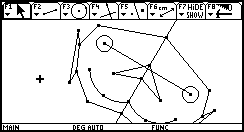
2. Use rotations to construct Equilateral Sea, and place a
point inside the triangle to represent the hungry sharks. Construct
perpendicular lines from the sharks to each of the sides of the
triangle and the intersection points on the beaches.
3. Where should Tiger place his family in the Equilateral Sea
in order to swim the least distance for his three hunting
trips? Explain your reasoning.
4. What if the sharks lived in Isosceles Sea? Would your results
from step 3 change? Why or why not? Explain your analysis.
EXPLORATION 6-3. CONSTRUCTING PARALLELOGRAMS
Objective: Construct a parallelogram and rectangle.
Modify the parallelogram into a rhombus and the rectangle into
a square.
1. CREATE A NEW DOCUMENT with the variable pararect.
2. Create an oblique line and a parallel
line approximately 3 cm away. Connect the points on each line
with a segment as shown in the diagram below to the left.
3. Construct a point on the line to the
left. Construct a line parallel to the segment passing through
this point, and create a point of intersection as shown in the
diagram above to the right.
|
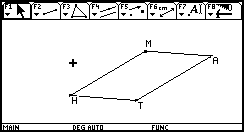
4. Label the vertices M, A,
T, and H. Construct overlapping segments and hide
the three lines until your parallelogram matches the one to the
right. It's quickest to hold
down the shift key, select all three lines, and then choose the
hide command. Remember to hit ESC after you hide the lines.
5. Measure the slopes of the sides of the
figure. Drag the vertices around until the slopes change. Is
the figure still a parallelogram? Explain how you know.
|
 |
6. Delete the slope measurements. Measure
the length of each side of MATH. Drag the vertices until each
of the sides have the same length. This special type of parallelogram
is called a rhombus.
Once you drag the vertices again, the parallelogram is no longer
a rhombus because the sides will not have the same length. Your
goal in chapter seven of the text is to construct a rhombus once
you familiarize yourself with its properties.
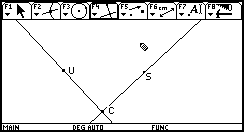
7. Clear the screen. Create an oblique line and then construct
a perpendicular with a point of intersection C. Place point
U on one line and point S on the other line as shown
below to the left.
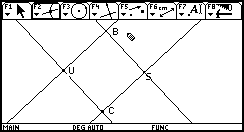
8. Draw perpendicular lines passing thru points S and U. Label
the point of intersection B as shown in the diagram above
to the right.
9. Create overlapping segments CU, UB, BS, and SC. Hide the
four lines. Choose Hide/Show, and
then select the four lines by pressing ENTER.
10. Measure the length of each side of the figure CUBS. Drag
points U and S until the measurements of all of the sides are
equal. The most specific name for this figure is a square because
all of its angles and sides are equal. This quadrilateral can
be named a parallelogram, a rectangle, and a rhombus. Make necessary
measurements on the calculator to justify why these names are
also applicable to the figure. Explain below.
11. Once you drag the vertices again, the rectangle is no longer
a square because the sides will not have the same length. Clear
the screen and use rotations to construct a square that
will always remain a square even after you drag around the endpoints.
Explain the steps to your construction below.
Recall that you must create a
numerical edit (under F7) for the number of degrees you wish to
rotate the object.
EXPLORATION 6-4. CONSTRUCTING A KITE
Objective: Construct a kite
using three different methods.
1. CREATE A NEW DOCUMENT with the
variable kite.
2. Construct a kite using two intersecting
circles as shown in Figure I of your text on page 323. Hide the
circles and leave only the kite. Make necessary measurements on
the calculator to justify why this is a kite. Explain below.
3. Clear the screen. Construct a kite using a reflected triangle
over a symmetry line as shown in
Figure II of your text on page 323. Make necessary measurements
on the calculator to justify why this is a kite. Explain below.
|
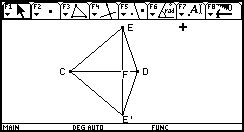
4. Modify the vertices of the kite to make
it convex (if necessary). Create the second diagonal of the kite
and label the intersection of the diagonals F as shown in the
diagram to the right.
5. Explain in a complete sentence below
how the diagonals of a kite relate to each other. Make necessary
measurements on the calculator to justify your answer below.
Differentiate the diagonals by calling CD the symmetrical diagonal.
|
 |
6. Clear the screen. Construct another kite using a different
method based on your explanation in step 5. Use an exploration
from chapter five for additional assistance. Explain the steps
to your construction below.
EXPLORATION 6-5. CONSTRUCTING A TRAPEZOID
Objective: Construct a trapezoid
and an isosceles trapezoid, and explore their properties.
1. CREATE A NEW DOCUMENT with the
variable trapez.
2. A trapezoid is a quadrilateral with at
least one pair of parallel sides. Construct a trapezoid that is
not a parallelogram. Explain the steps to your construction
below. Make necessary measurements on the calculator to justify
why this is a trapezoid and explain below.
|
3. Measure and label a pair of consecutive
angles between a pair of parallel sides, as shown in the diagram
to the right.
4. Drag the endpoints of the original segment until you see
the angles change measurement. What relationship exists between
these angles?
|
 |
5. Clear the screen. An isosceles trapezoid
is a trapezoid that has a pair of base angles equal in measure.
Construct an isosceles trapezoid using the Isosceles Trapezoid
Symmetry Theorem and the drawing related to the theorem on
page 330 of your text. Hint: Use a Reflection. Explain
the steps to your construction below.
6. Measure the length of the legs, the non-parallel sides,
of the isosceles trapezoid. Drag around the vertices until the
measurements change. What relationship exists between the legs
of an isosceles trapezoid?
EXPLORATION 6-M. MYSTERY QUADRILATERALS
You will need Graph Link cable and software to download
the files used in this exploration. Make sure that your browser
preferences are set to read graph link files with extension 92A.
Once you are ready, click on each of the file names to download:
Objective: Determine the most
specific name for each mystery quadrilateral (parallelogram, rectangle,
square, rhombus, trapezoid, isosceles trapezoid, kite, or quadrilateral).
|
You must provide a valid "proof"
for each mystery quadrilateral. For each quadrilateral, write
a short paragraph (see below for an example). Support your answer
with the measurements you have taken. Make sure that you list
all relevant measurements on your lab. Also be sure to state
why the quadrilateral could NOT be any other name.
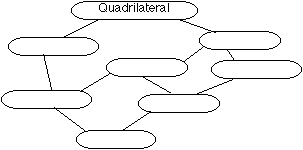
Before getting started, fill in your hierarchy to refer back
to if needed!
|
 |
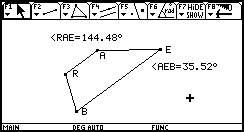
1. Open QUAD1 in the MYSTERY folder.
MYSTERY QUADRILATERAL #1
| Solution Paragraph. |
sketch of diagram and relevant measurements!
|
2. Open QUAD2 in the MYSTERY folder.
MYSTERY QUADRILATERAL #2
| Solution Paragraph. |
sketch of diagram and relevant measurements!
|
3. Open QUAD3 in the MYSTERY folder.
MYSTERY QUADRILATERAL #3
| Solution Paragraph. |
sketch of diagram and relevant measurements!
|
4. Open QUAD4 in the MYSTERY folder.
MYSTERY QUADRILATERAL #4
| Solution Paragraph. |
sketch of diagram and relevant measurements!
|
5. Open QUAD5 in the MYSTERY folder.
MYSTERY QUADRILATERAL #5
| Solution Paragraph. |
sketch of diagram and relevant measurements!
|
6. Open QUAD6 in the MYSTERY folder.
MYSTERY QUADRILATERAL #6
| Solution Paragraph. |
sketch of diagram and relevant measurements!
|
EXPLORATION 6-6. ROTATION SYMMETRY
Objective: Compare the number of vertices in an object
to its angle of rotation.
1. CREATE A NEW DOCUMENT with the variable rotsym.
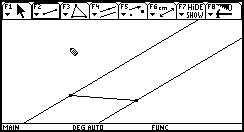
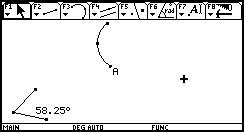
| 2. Place point
A in the middle of the screen. Create an arc, starting at point
A, and ending near the top of the screen. Create and measure
an angle in the lower left-hand side of the screen as shown in
the picture to the right. |
 |
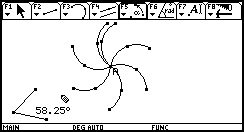 |
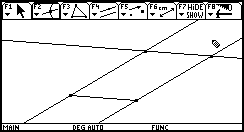
3. Rotate the
arc about point A using the angle. Repeat the arc rotations until
the arc has gone completely around (make seven arcs). Note that
the arcs may not perfectly overlap. |
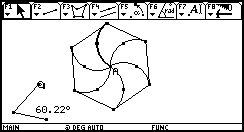
| 4. Create a seven
sided polygon (heptagon) which has vertices touching the ends
of each arc as shown in the diagram to the right. |
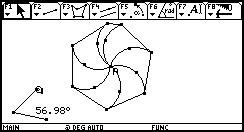 |
| 5. Adjust the
angle in the lower-left hand side of the screen until there is
exactly six spokes/vertices as shown above in the picture to
the right (two arcs/vertices overlap). The arcs do not have to
be perfect, but should be close to overlapping. Record the information
below. |
 |
| #arcs/vertices |
name of polygon |
degree of rotation |
| 6 |
hexagon |
|
| 5 |
pentagon |
|
| 4 |
quadrilateral |
|
| 3 |
triangle |
|
6. Adjust the angle in the lower-left hand
side of the screen until there are exactly five spokes/vertices.
Record the information above. Repeat the procedure until the table
above is complete.
7. The overlapping arcs/vertices occur in
this exploration because you are creating a special type of polygon.
Make up a name that you would use to classify these polygons.
Make necessary measurements on the calculator
to justify why you have chosen this name. Explain below.
8. Write an equation below relating the
number of vertices (V) in this special type of polygon compared
to the degree rotation (D) between consecutive vertices in the
polygon. Explain how you determined this.
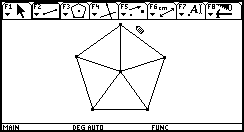
EXPLORATION 6-7. REGULAR POLYGONS
Objective: Determine
properties of a regular polygon
1. CREATE A NEW DOCUMENT with the
variable regpoly.
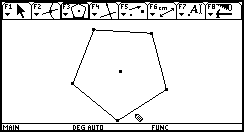
| 2. Create a regular
pentagon that will cover a large portion of the screen as shown
to the right. Press F3 and choose 5: Regular Polygon,
move the pencil to the center of the screen, press ENTER to locate
the center, move out from this center (you'll see a dotted circle)
as far as you can before part of the circle goes off the screen.
Press ENTER. Move the pencil away from the point on the dotted
circle until the screen reads {5} and press ENTER. You
will see a regular pentagon as shown to the right. |
 |
3. Measure the side lengths and angles of
the regular pentagon. Explain below two properties of regular
polygons which you discovered.
|
4. Connect seven segments from the center
of the pentagon to each of its vertices. Five triangles should
form as shown in the diagram to the right.
Do you know which company uses this design as their logo?
5. Without measuring on your calculator, determine
the measure of each of the three angles in one of these triangles.
Explain your reasoning and show your work below. Hint: Look back at Exploration 6-6.
|
 |
6. Check your answer to step five by measuring
each angle of one of the triangles. If your answers do not match,
go back and check your work.
These activities have been designed by Evan Glazer at the University
of Georgia, and Phil Gartner at Glenbrook South High School in
Glenview, IL. These resources should only be used for nonprofit
purposes. Contact eglazer@coe.uga.edu
or pgartner@glenbrook.k12.il.us
if you have questions or comments.
Last revised: August 2000