Objectives: Students will explore the Pythagorean Theorem using GSP.
Materials: GSP and Student worksheet adapted from Exploring Geometry with Geometer's Sketchpad published by Key Curriculum Press
NAME:__________________________
In this activity, you'll create a script for constructing a square, then you'll construct squares on the sides of a right triangle. The areas of these squares illustrate the Pythagorean theorem.
1. Construct a segment AB.
2. Mark point A as a center of rotation by highlighting the point and choosing Mark Center "A" under the Transform menu.
3. Select segment AB and point B and under the Transform menu choose rotate. You will have to type in that you want to rotate by 90 degrees and then hit ok.
4. Mark B' as the center and rotate the new segment and point A 90 degrees.
5. Construct the segment between A' and B. You should have created a square.
6. Construct the polygon interior by selecting all 4 vertices and going into the Construct menu and choosing Polygon Interior.
7. Hide your labels.
8. Create a Script. To do this, select the entire square and the go to the Work menu. Under the Work menu, choose Make Script. A little screen will pop up for your script.
What properties of a square did you use to construct it?
Answer:____________________________________________________________
9. Experiment with playing the script to get a feel for the way it works. Note that the direction in which the square is constructed depends on how you play the script.
10. Open a new sketch.
11. Construct segment AB.
12. Construct a line through point A that is perpendicular to segment AB.
13. Construct segment BC, where point C is a point on the perpendicular line.
14. Hide the perpendicular line and construct segment AC.
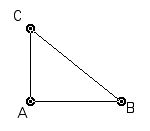
15. Drag each vertex to confirm that your triangle stays a right triangle.
What property of a right triangle did you use in your construction?
Answer:___________________________________________________________
16. Change the labels so that the right-angle vertex is labeled C and the other two vertices are labeled A and B.
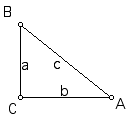
17. Show the labels of the sides of the triangle. Change them to a, b, and c so that side a is opposite of angle A, side b is opposite of angle B, and side c is opposite of angle C.
18. Choose two of the vertices of the triangle and play your square script to construct a square along the side of the triangle. Construct squares using the script along all three sides of the triangle. Drag the vertices of the triangle to be sure that the squares are properly attached.
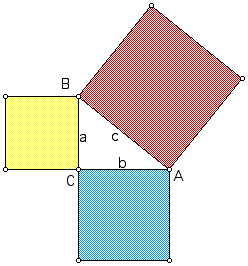
19. Click on the squares one at a time and measure the area of each square by going to the Measure menu and choosing Area.
20. Measure the lengths of sides a, b, and c.
21. Drag each vertex of the triangle and observe the measures.
Describe any relationship you see among the three areas. Use the calculator to create an expression that confirms your observations.
______________________________________________________________________________
______________________________________________________________________________
Based on your observations about the areas of the squares, write an equation that relates a, b, and c is any right triangle. (Hint: What's the area of the square with side length a? What the areas of the square with side lengths b and c? How are these related?)
___________________________________________________________________
___________________________________________________________________