
| Foreword: |
Tiger Planter Project is a hands-on project that I developed for the Project Success Mathematics class that I teach. The Tiger Planter is a project in which the students build a planter. The main focus of the project is promoting measurement skills and team work. The following is a brief description of the project and the necessary steps that a student would need to take to build the planter. This description is given from a student's (Chandra) perspective. The teacher notes are intended to be accessed by the teacher to help them facilitate the project. (Teachers please access Teachers Note #1.)
I hope you enjoy it,
Michael Akes
Hello,
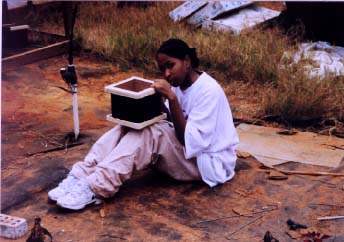
My name is Chandra. I would like to show you a fun project that you can do in your mathematics class. We called the project the Tiger Planter Project. In the project, we built a planter for a plant. We called it a Tiger planter because our school mascot is the Bengal Tiger. The following is the steps that you will need to take to build a planter. I have also included some pictures that will show you how much fun that you will be having. The following is a picture of me with my finished planter.
 |
The first step in trying to build something is to get an idea of what it is you are trying to build. We did this by everyone make a sketch/drawing of a planter. Mr. Akes sat a planter on the overhead cart in front of the class. We made a drawing of the planter and labeled its dimensions.
We made a list of all the parts needed to make the planter. This list included both how many of each part that we needed and the dimensions. We used both the drawings we made and the planter in front of the room. When each group was finished with their parts list, one person from each group put their group's list on the board. We then, as a class, compared parts lists and came up with one list we could all agree upon.
The next step we took was to take the parts list and make a drawing of each part of the planter. The drawings were done to scale. We worked in groups throughout the project and sometimes that was the hardest thing to do. Even though we each would do a drawing, we all had to agree on the dimensions.
Next, we had to decide how much material we needed. We knew the sides and bottom of the planters would be cut out of a sheet of paneling that was 4 ft. by 8 ft. and the blocks would be cut out of boards that were 8 in. wide and 8 ft. long. We constructed sheets of paper with these dimensions so we could see how many planters we could get from one sheet of paneling and one board.
Once we had our 4 ft. by 8 ft. sheet of paper and our 8 ft. by 8 in. sheet of paper, we needed to see how many planters that we could make from each. We took our parts list and cut out a representative of each part. Then we traced the bottoms and sides on the 4 ft. by 8 ft. sheet and the blocks on the 8 in. by 8 ft. sheet.
Once we decided how many planters could be made from one sheet of paneling and one board, we then had to figure out how much material we needed to order for everyone to make a planter. Once we had agreed upon how much material we needed, we then had to figure the amount of money that was needed to buy the material.
When the material arrived that we had ordered,we had the construction class rip the material down to the width that we needed. We then measured and marked out each part.
Finally, we got to assemble our planters. We used a hot glue gun to assemble them. I had to be real careful not to get any of the glue on myself or on anyone else.
We had to sand the planters to prepare them for painting. This was one of the hardest steps of all.
Finally, we were ready to paint the planters. We were able to choose whatever color we wanted to paint our planters.
I hope that you enjoyed learning about how we built our planters because I sure enjoyed telling you about it.
Chandra