
Back to Directory
Back to Section 1, Question 2
On to Section 3
Section 2, Question 2
Technology tools in mathematics instruction.
a) Select a topic in the school mathematics that you teach (or might teach). Describe how you would use technology tools to teach the topic. Discuss how technology tools would enable you to change the coverage of the content in the topic.
b) Select a topic not now included in the school curriculum that you feel technology tools would allow you to teach. Discuss the topic, how you would teach it, and why you would introduce it.
Response to Part A:
One subject that is talked about a great deal in algebra is the concept of multiplying binomials such as x+2 or x+3. We are so used to multiplying these terms together and just ending up with a quadratic expression. We may even take this quadratic expression, go to our TI-82 calculator, and graph the product as y = x2 + 5x + 6. When we use the graphing calculator, we can see that the conic section formed is a parabola that is facing "upward." We will eventually get around to seeing that the parabola passes through the solutions x = -2 and x = -3.
What we seem to take for granted is that these terms can be seen as arbitrary lengths that, when multiplied together, will give an area. One way that we can use technology in a manner that we are not quite used to is by using Geometer's Sketchpad to illustrate this area.
I will go through this lesson, and if you choose, you can follow my directions. You will need to start up GSP on your computer, or you may just click here for the GSP sketch that I am describing.
The first step, once you have started GSP is to go under the "graph" menu and select "create axis." Once these axis are created, you should then mark off a random point on the x-axis, by selecting the x axis, going under the "construct" menu and selecting "point on object". Label this point x. You will want to put this point somewhere on the x axis between the points (1, 0) and (2,0).
You will see that you have been given a point at (1, 0). You should not click on this point and try dragging it around on the sketch because it is the point that controls the scale of the axis. If you drag this point toward the origin, the point will make the axis very small and tight; whereas dragging this point to the right will make the scale very large. Carefully label this point "1".
Next, you will want to select the point at the origin and the point at (1,0), in that order. Go under the "transform" menu and select "mark vector...;" you have now given GSP a set length of one unit to put into its memory. Next click on the point x. While it is selected, go under the "transform" menu again, and this time, select "translate." You will be given the option of translating "by marked vector." This means that the point x will be extended to the right by the vector length in GSP's memory (that we made one unit long). The newest point to the right is now x units long, plus one unit. We have now constructed a point at x + 1. Clicking on the point at x + 1 and repeating the translating process will put points at x + 2, x + 3, etc. Since we would like to multiply x + 3 times x + 2, x + 3 will be an appropriate place to stop translating.
Next, we would like to have a point on the y axis that is x + 2 units from the origin. The simplest way to get this point is to, first, make sure that no other points are selected. Then, we need to double-click on the origin. You should see the origin "flash." Since we need a point that is x + 2 units up the y axis, click on the point on the x axis that is x + 2 units to the right. When we double clicked on the origin, we made that point a point that can be rotated around. While the x + 2 point is selected, go under the "transform" menu and select "rotate." Then type in that we want to rotate the x + 2 point 900 to the y axis.
The next step is to finish creating the rectangle in the first quadrant, with the upper-most right-hand point being the at the coordinate (x+3, x+2). Once you have created this rectangle, simultaneously select the four vertices of this rectangle. Go under the "construct" menu and select "polygon interior".
Then, find the coordinate of the point (x+3, x+2) by going under the "measure" menu and selecting "coordinates". The x-coordinate represents the length of the horizontal sides, and y-coordinate represents the length of the vertical sides. Next, double-click on the coordinate you just found. This will bring up GSP's calculator function. Pull down the "values" menu on the calculator and select "x'. Then select the "*" on the keyboard of the calculator. Pull down the "values" menu again and select "y". Finally, click "OK". This will provide you will the product of the x coordinate and the y coordinate. This value also represents the area of the rectangle formed by the two arbitrary lengths x + 2 and x + 3.
An interesting next step is to simultaneously click on the point x on the x axis and the x axis itself (not on a point occupied by the rectangle). While both of these items are selected, go under the "edit" menu, choose "action button" and slide over to "animation". Accept the option that GSP provides, then click "OK". There will now be an "animate" button on the sketch that you should double-click. This will make the x-value on the sketch change, which will in turn change the area of the rectangle (making x a true "variable").
Now for the coup de grace: Find the distance from the origin to the x coordinate on the x axis. Select the measurement of that distance simultaneously with the coordinate that represents the area of the rectangle (in that order). Go under the "graph" menu and select "plot as (x, y)". You should be able to scroll to the top of the screen and see a point that does not seem to have a great deal of meaning. If you find the coordinate of this point, you may find a clue. Select this point, and let it be the only point selected. Go under the "display" menu and select "Trace Point". Scroll back down toward the origin, where you have a good view of the x and y axes. Click on the animate button and watch what comes from that traced point.
You should see that the curve that is drawn is the parabola you hopefully have already seen on your graphing calculator, and the points that the parabola crosses on the x-axis are, of course, x = -2 and x = - 3. This lesson is not only an effective way to show students that a parabola can cross the x axis at a pair of points, but also it can show that the term "variable" does have some meaning when showing this area function.
Response to Part B:
The following topic is one that can be used on a "geoboard," but as is the advantage most of the time with technology, Geometer's Sketchpad will allow us to do many more explorations, much more quickly. The only stipulation in using GSP is that we will only use the "measure" menu to verify our findings. We will need to avoid using the measurement capabilities of GSP in order to generate a table that we will discuss below.
To begin this lesson, we will have a brief discussion of finding the area of a triangle on a geoboard. As we know, the area of a triangle is 1/2(b)(h), and in some cases, this formula will be a key.
In working with Pick's Theorem, possibly the easiest way to see this theorem exemplified is perhaps in the use of the geoboard. In case you have not seen a geoboard, it literally is a flat piece of wood with pegs on them that form a grid. On this board, and with the pegs, you can put a rubber band around the pegs to form different kinds of polygons. The polygon that you are trying to form on the geoboard for Pick's theorem is the triangle. Let's take a look at an image of a geoboard with a triangle already on it:
As you may be able to see, the above triangle ABC has vertices A, B,
and C all changing the directions of the sides of the triangle. That is,
as soon as segment AB reaches vertex B, the line (rubber band) changes direction
and becomes segment BC at vertex B. As soon as the rubber band gets to
vertex C, it changes direction again to form segment AC. The rubber band
is thereby wrapping itself around the points at A, B, and C. I know that
it's difficult to see from the figure above, but there are three rows and
columns of pegs for a total of nine pegs (an actual geoboard would usually
be 10 x 10). It should be noted that there are pegs directly between points
A and B, and between points B and C. This picture can be created on
GSP by going under the "graph" menu and selecting "show grid".
Creating points using the point tool will snap directly onto these "pegs."
The beauty of using GSP, is that we can move the segments from peg to peg,
the segment (or what would be a rubber band on a geoboard) will wrap around
a peg.
Consider the number of pegs that the dark blue segment touches, including the vertices; these are called border points. So the above case has six border points. If there were any points that were inside the triangle that did not touch the rubber band, these would be called interior points (we will see interior points in the next figure).
Let's say that the distance between pegs is one unit. On Geometer's Sketchpad, a unit is a centimeter. A typical geoboard has pegs that are one inch vertically and diagonally apart. In the picture above, the points are one centimeter apart, as the picture has been acquired from a GSP sketch.
Even if a student does not know how a geoboard works, he/she could probably tell (with minimal knowledge of geometry) that the triangle above has a height of two units and a base that is two units. With those dimensions in mind and the knowledge of the formula for area of a triangle, a student should be able to tell that the area is two square units. When looking at it in terms of the "pegs," the distance from A to B is two pegs, and the distance from B to C is also two pegs. Considering that these two distances are the base and height of a right triangle, you should see that the area is two square units.
What I would like to do now is show you how other triangles would look on a geoboard through using GSP. I will now place a few images on this page for you to examine:
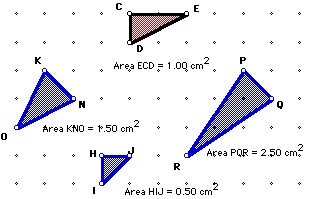
What I have done is give you four triangles of varying length and width, where the triangles have either none, one, or two interior points, and they also have varying numbers of border points.
Let's first take a look at triangle CED. This triangle has no interior points, but it does have four border points. Try to keep track of what the respective areas are. The area for this triangle is 1 square unit (1 square centimeter in this case).
The next triangle I would like you to look at is the triangle HIJ (bottom of the image above). This triangle has three border points but no interior points. The accompanying area is .5 square units (or .5 square centimeters). It would make sense that the area is .5 square units because if the base is 1 unit and the height is one unit, then the area should be (.5)(1)(1) = .5 square units.
Now, let's make things a bit more complex.
The third triangle I would like you to look at is triangle PQR. This triangle has three border points and two interior points, and, interestingly enough, it has an area of 2.5 square units. Take a closer look at this triangle and the points surrounding it:
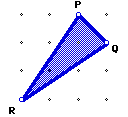
Trying to find the area by using 1/2(b)(h) is going to be quite a bit more difficult when we don't really know what the distance of points that are diagonal from each other by just "eyeballing" the points. A possible way to find the area is to take the area of the entire square of points (4 x 4) and assume that this area is 16 square units. If you take the point in the top-left hand corner and call it say, "T," then the area of hypothetical triangle TPR is 4 square units. Let's do this process again for the top-right hand corner and put a point "S" in that corner. The triangle in the top-right corner is now hypothetical triangle PSQ. This triangle has an area of .5 square units. If we repeat this process once more for a hypothetical point in the lower-right hand corner, call it "V," then a hypothetical triangle in this corner becomes triangle QVR. A length of this triangle is 2 units, and the base is 4 units, thereby making the triangle's area 4 square units. So the total area of these three hypothetical triangles is 8.5 square units. (If you missed what I did: all I did was make triangles from the gray areas not being occupied by the blue triangle in the middle of the grid; after that I took the areas of those "gray" triangles and added those areas). If we take the area of the overall grid - 16 square units - and subtract the areas of the hypothetical "gray" triangles - 8.5 square units - we come up with the area of the blue triangle PQR as 7.5 square units. Problems like these are the only time that calculating the areas can get tedious.
We could repeat the same process for calculating the area of triangle KNO as we did with the triangle PQR, and we would still come up with the area of 1.5 square units.
Hopefully, our students have been keeping a running chart on a separate sheet of paper concerning the areas of the aforementioned triangles, their border points and their interior points. Here is a table of what we've seen so far:
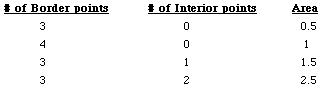
Just by just looking at this table we probably will not be able to see the pattern that occurs by changing the numbers of border points and interior points. We almost certainly will not be able to immediately derive Pick's Theorem from the above data. For us to really be able to come up with a pattern or derive a formula, you will really need to have the use of GSP. This will allow you to manipulate the data much more quickly and efficiently. There will be certain types of triangles with different border points and interior points that will be difficult (if not seemingly impossible) to construct. Although you may not be able to construct certain triangles, you will certainly be able to come up with enough data to complete a pattern and derive a formula.
Next, I would like to display a table that is much more in depth and shows the areas for the various numbers of border points and interior points:
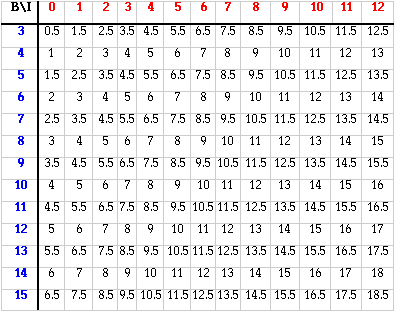
Before we talk about the data, we need to make sure that our students understand what is happening in this table. First, the red numbers going across the top represent the number of interior points, and the blue numbers coming down the left side represent the number of border points.
After seeing this data in tabular form, we can clearly see that if we hold the number of border points constant and increase the number of interior points by one, then the area increases by one square unit. On the other hand, we can see that if we hold the number of interior points constant and increase the number of border points by one, then the area goes up by one square unit.
So our students should see by now that we have a large set of numbers given that we can change the number of border points and the number of interior points to give us a multitude of different areas. What we need to do now is decide what the formula for finding the area is given a certain number of border points and interior points.
We discover that for no interior points, the area was the number of border points minus two, then divided by two (e.g., for six border points, 6 - 2 = 4, then divided by 2 equals 2; for eight border points, 8 - 2 = 6, then six divided by 2 = 3). Then we are led to believe that the area could be unrelated to the interior points, until we start to calculate areas with one border point, two border points, etc.
While holding the number of interior points steady at one, then changing the number of border points, we could see that the area was equal to the number of border points, divided by two. We immediately are able to recognize that the area is going to be very dependent on both the border points and the interior points.
We then examine the area when we hold the number of interior points steady at two and change the number of border points. We want to hold on to our theory that this formula had something to do with dividing the number border points by two. It just comes down to finding out how the number of interior points affected the area. When we take six border points with two interior points, we claim that six divided by two is three, and with two interior points, the area came to four square units. With eight border points and two interior points, eight divided by two gave us four, and the area came to be five square units.
From here, we should realize that the number of border points is key, but the number of interior points is equally important. What was happening is that number of interior points MINUS ONE was being added to the number of border points divided by two. This made a formula that came out to:
In algebraic form, we could let A = the area, B = the number of border points, and I = the number of interior points. So the formula now becomes A = (B / 2) + (I - 1).
This is Pick's Theorem and how it works for the geoboard and GSP. This is something that I have never personally taught in high school geometry; however I do feel that it is a valid topic that could easily be covered in the high school curriculum given the use of GSP.