Similar to each of the previous constructions, the two-dimensional expanded pattern (surface) of the shape is constructed by identifying certain points along plan (base), then finding the corresponding locations on the elevation (side), and finally projecting those points onto the expanded pattern.
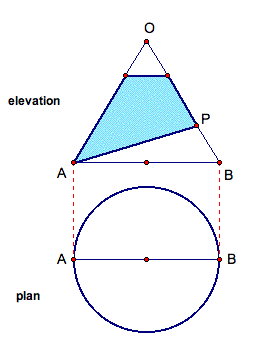
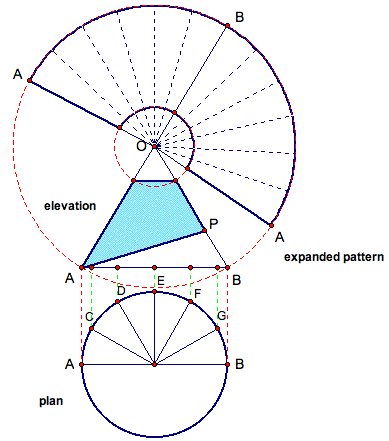
Again, given the plan and elevation of our shape, we can label some important points to begin our construction. It is important to make sure the plan sits directly below the elevation and label points A and B on each. Note these points represent the diameter of the base, and either side of the elevation, but point B does not actually line on this round taper.
Unlike the previous construction, this taper sits on a pitch. In other words, the base of this shape is at an angle which could be found on a roof or other slanted surface. Label this point P as shown below. Again, point O is labeled as the vertex of our cone, although it does not actually lie on the round taper
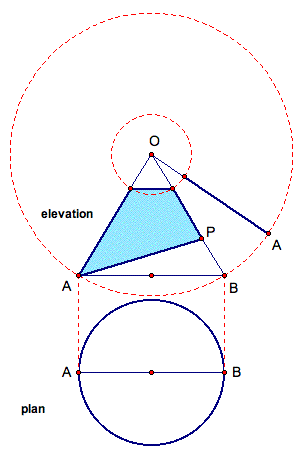
Similar to the round taper construction, we must determine the base of our expanded pattern. So, draw new line OA to represent one side of the expanded pattern. Construct the two circles, each with center O, to represent the top and bottom of the expanded pattern. Essentially, the curved surface of the round taper will be projected around these circles to find the complete expanded pattern.
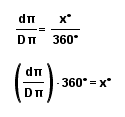
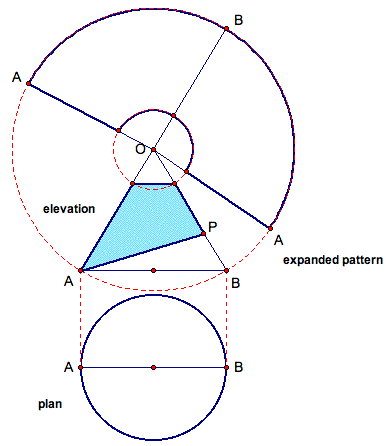
How far around the circumference of the larger circle will the base of our expanded pattern occupy? Let d represent the diameter of the round taper (i.e. d is the length of segment AB). Let D represent the diameter of the larger circle (i.e. D is 2* the length of segment OA). Then, we can create a ratio to determine how many degrees our entire expanded pattern should be.
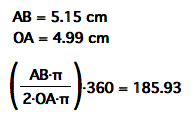
Let's use the lengths of our segments to find x!
So we have found the full expanded pattern should be 185.93 degrees around the circle from segment OA.
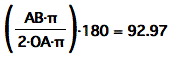
We can see that segment AB is the diameter of our shape. In other words, these points A and B are on opposite sides of the circumference of our shape. Therefore, point B will be in the center of our expanded pattern and we can adjust our ratio to locate point B on our expanded pattern.
So point B will be located 92.97 degrees around our expanded pattern from segment OA.
Label the points A and B on the base of our expanded pattern as shown below. Why are there two points A on the expanded pattern? Well, remember the expanded pattern has been unrolled. So when reassembled, this pattern will be our three-dimensional round taper with a seam at point A. Basically, these points A are the same.
Now, since our round taper has a pitch rather than a flat base, we must construct the pitch on the expanded pattern. So we must identify points on the plan of this round taper, and find out what the pitch of the taper is at those points. So, first divide the plan into points C G as shown below, each being 30 degrees apart. Any number of equally divided points will work, and as we will see, the more points chosen, the more accurate the expanded pattern becomes. Here we have chosen 5 points to see the pattern.
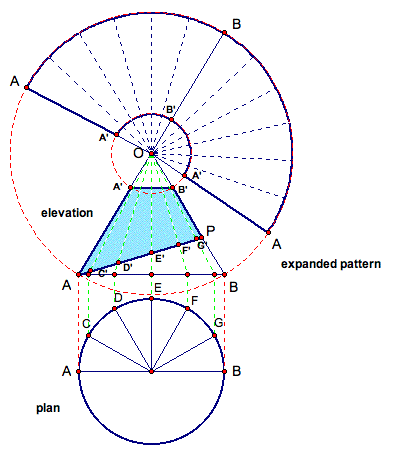
Also, we should draw lines on the expanded pattern, also equal degrees apart. Remember since we are using 5 points on the plan, we should draw 5 lines on the expanded pattern from point A to point B. And again, since our elevation is only half of our shape, 5 more lines will have to be drawn to account for the other half of our shape. These blue dashed lines represent the pitch of our round taper, at those specific points.
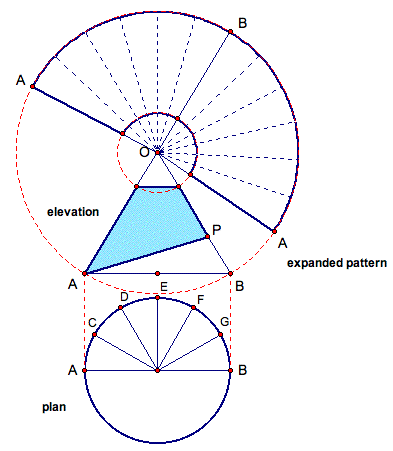
Now, we must identify the location of points C G on the elevation. Project the dashed green lines up from the points on the plan, perpendicular to segment AB on the elevation. These new points represent the locations of C G on the base, if our shape were flat. Since our base is at an angle, we must construct the location of these points on the angle!
Now that we have projected points C - G onto segment AB, let's project them to the vertex of the cone, or point O. This way, we can find exactly where points C - G lie on the surface of our round taper. Here we are concerned with where those green lines intersect the pitch, or segment AP. Label these points C' G'. These new points now represent the different heights of each of these points from the circumference. We can see for example, that point C' from the circumference is lies further down the round taper than point G' does as shown on the elevation.
While we are at it, it is a good idea to mark A' and B' at the top of our round taper, and along our expanded pattern.
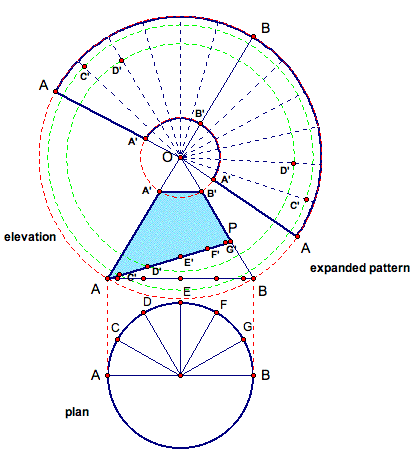
So now we have equally spaced points C - G on the plan, and their corresponding locations on the elevation as points C' - G'. Finally, we must determine where exactly those points lie on the expanded pattern. Well, remember we created the larger dashed circle by using the radius of OA and creating a circle. Since point A lies on the base, this circle created gave us the position of A on the expanded pattern. Well, how do you think we will find the positions of points C' - G'?
By projecting them around the circle of course! Using radius OC' and OD', create two circles whose centers are at point O. These dashed green circles represent the exact location of point C' and D' on our expanded pattern.
Now we must use the correct dashed blue lines to mark C' and D' on the expanded pattern. Look closely at the elevation. Notice points C' and D' are the closest points to A. Therefore, their locations on the expanded pattern should also be the closest to point A! Mark the appropriate intersections C' and D' as shown below. Remember, the expanded pattern represents the whole shape, while the elevation only shows half of the shape. So, there will be two C's and two D's on the expanded pattern.
Now, repeat this process for points E' and F' as shown below. Again, use the radius of OE' and OF' to create the green dashed circles. Then, note the locations of E' and F' on the elevation and mark the intersection on the expanded pattern accordingly as shown below.
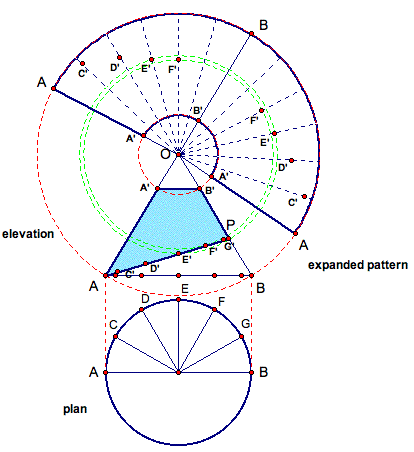
Then, repeat this process one more time for points G' and P. Similarly, mark the appropriate intersections on the expanded pattern. So we have identified the locations of all of our points C' - P on the expanded pattern!
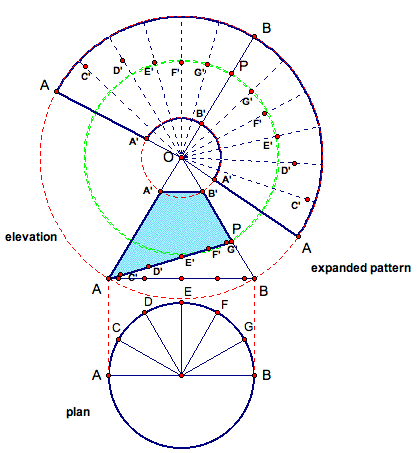
Then, connect the points as shown below.
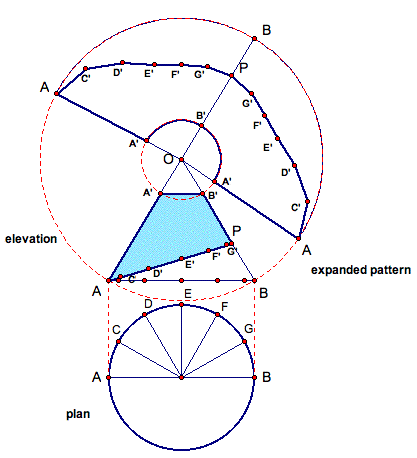
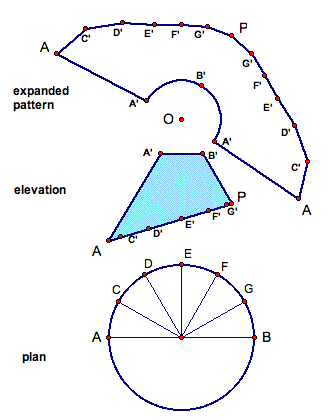
Finally, by removing all of the construction lines we can see the constructed expanded pattern for our round taper with a pitch! So, if you were to roll our expanded pattern back in to our round taper shape, you would have a taper with the size of the given plan and given elevation, and with the correct pitch!
Click here to see the Geometer's Sketchpad file that generates the pattern for the round taper with a pitch.
Click here to view the
Graphing Calculator file of the three-dimensional round taper
with pitch.
Return
to Essay 2: Complete the Pattern