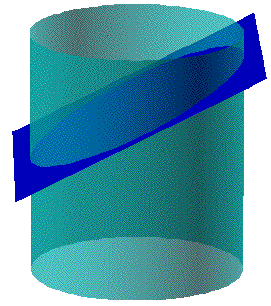
Similar to the construction of the rectangular ducts, to construct the expanded pattern of round pipes, we must first identify certain components of our shape. Given the plan (base) and elevation (side) of the round pipe, we can geometrically construct the two-dimensional expanded pattern (surface). Essentially we are "unrolling" the round pipe from three-dimensions into two-dimensions.
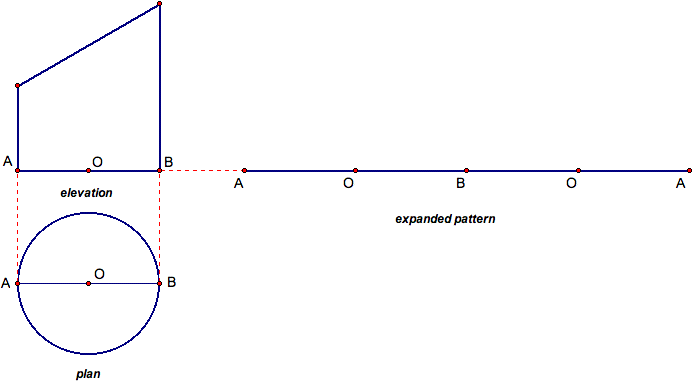
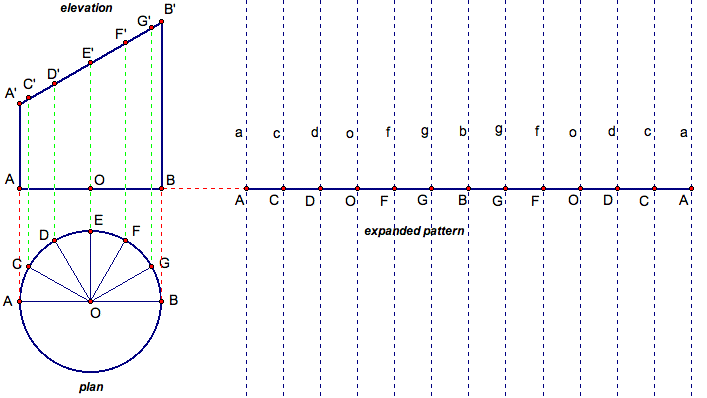
Again, make sure the plan sits directly below the elevation and label points A and B on each. Note these points represent opposite points on the circumference of the base, or on either side of the elevation. Point O is labeled as the center of our shape, and as the midpoint of segment AB on the elevation.
So, how can we determine the base length for the expanded pattern? Notice our expanded pattern is derived from simply unfolding our three dimensional shape at point A. So, the base represents the entire circumference of our round pipe and its length is 2pi*r with r being the radius of the pipe. Draw the base of the expanded pattern as shown below and label the corresponding points A, O, and B. Note point A is labeled on both sides, because when the shape is refolded into a pipe, these two points will form the seam and are therefore the same. Note that point B is the midpoint of segment AA, and point O is the midpoint of both segments AB as shown below.
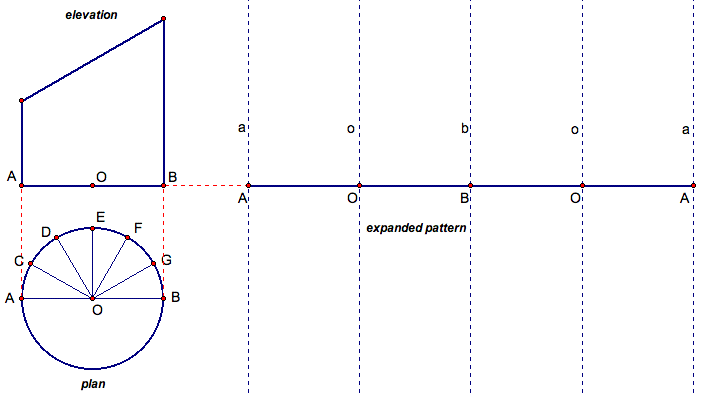
Now we must identify points on the plan of this pipe, and find out what the height of the pipe is at those points. So, first divide the plan into points C G as shown below, each being 30 degrees apart. Any number of equally divided points will work, and as we will see, the more points chosen, the more accurate the expanded pattern becomes. Here we have chosen 5 points to see the pattern.
Also, we should draw line a, line o, and line b, perpendicular to the base of our expanded pattern. These dashed lines represent the height of our round pipe, at those specific points.
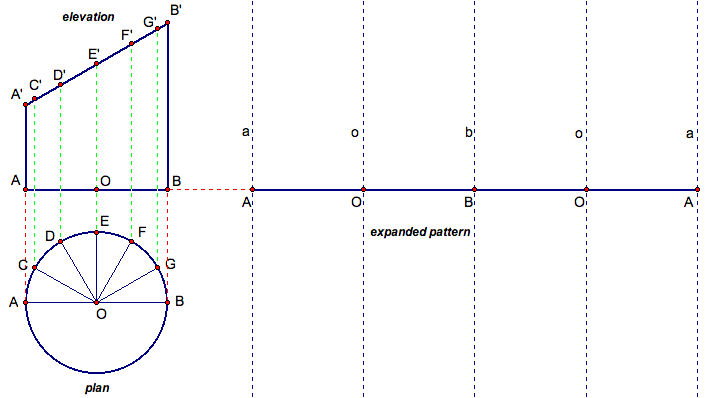
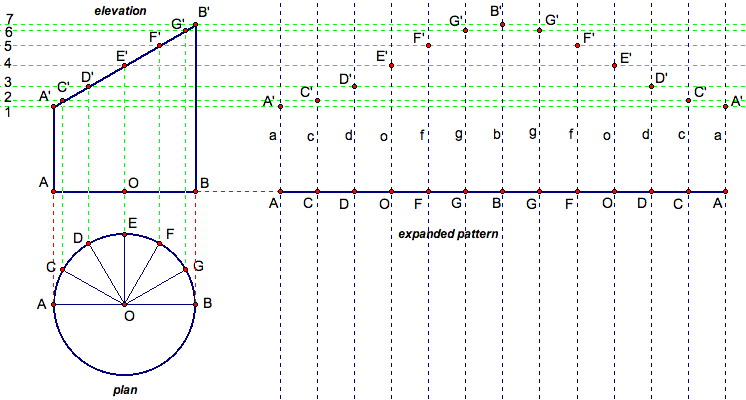
Next, we must identify the location of points C G on the elevation. Project the dashed green lines up from the points on the plan, perpendicular to segment AB on the elevation. Note where these lines intersect the angled portion of our round pipe. Label these points A' G'. These new points now represent the different heights of each of these points from the circumference. We can see for example, that point C from the circumference is actually shorter than point F on the elevation as shown below.
We must also mark lines on our expanded pattern base to correspond to the points C G. Recall how points C and G were found. They were constructed as equal degrees from the diameter of the plan, segment AB. Similarly, we must located points C-G on the base of our expanded pattern as equidistant along segment AB. Note our expanded pattern has two different segments AB. Since this base represents the entire circumference of our circle, and points C G were found only on one side of the circumference, we must use points C G for both sides. Hence, there are two points G on either side of B and so on. Once these points are located, draw lines c - g perpendicular to the base to again indicate the height of the pipe at these specific points.
So, now we have located several points along
the base of our round pipe (the plan) and the side of our round
pipe (the elevation). We have found the heights of the pipe at
each of those points and can use those heights to finish the construction
of the expanded pattern.
So, draw the green dashed lines 1 7 at each of the points
on the elevation A' G'. Where these lines intersect the
height lines from the expanded pattern will represent the two
dimensional fourth edge of our pipe. For example, line 1 passes
through point A' on the elevation. Where this line meets line
a on the expanded pattern, mark the intersection A' also. So,
the edge of our expanded pattern has a height at A', as shown
below.
Similarly, where line 2 (which passes through point C' on the elevation) intersects line c on the expanded pattern, mark the intersection C' also. So again, at that distance C around the circumference, our pipe has a height at C'. Follow the same procedure for finding the remaining intersection points. Again, recall that since points C G were found on one half of the circumference, the corresponding half will need to be marked, so we will have two of each point on the expanded pattern.
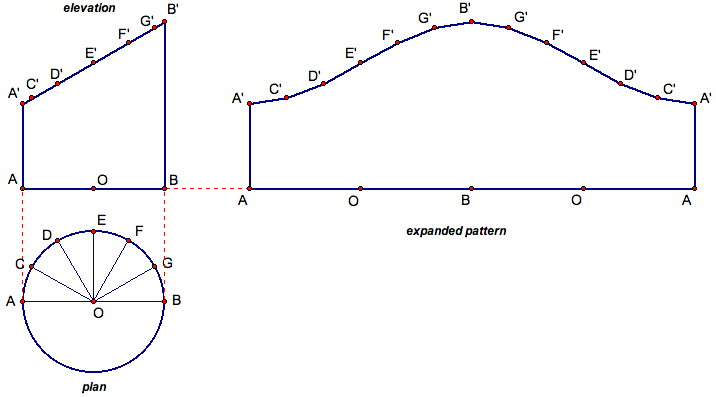
Finally, we can remove our construction lines and connect our points to see the completed expanded pattern. So, if you were to roll our expanded pattern back in to our rounded pipe shape, you would have a pipe with the size of the given plan and given elevation!
Click here to view the Geometer's Sketchpad file that generated the round pattern.
Click here to view the Graphing
Calculator file of the three-dimensional round pipe.
Return to Essay 2: Complete the Pattern